What is the purpose of DNS records for Google Workspace in Plesk and how do they ensure correct email delivery?
To put it simply, if you are using a program a.i. control panel called Plesk to manage your website or email, you need to tell it where your email should go. This is done by creating something called a DNS record, which is like a phonebook that tells other computers where to find your email.
In this case, you want to create DNS records that will allow you to use Google Workspace (formerly known as G Suite) to manage your email. This will involve adding specific information to the DNS settings in Plesk to ensure that email sent to your domain (like example.com) gets directed to Google’s servers.
Overall, setting up DNS records for Google Workspace in Plesk is just a technical task that ensures your email is sent to the right place.
Setup DNS records in Plesk
In this article we will cover how to setup DNS records for Google Workspace in Plesk, we will also cover how to disable local mail handling.
Prerequisites
- Google Workspace account
- Plesk account
Step 1: Log in to your Plesk account and select the domain.
First thing to do is navigate to Websites & Domains, Go to the DNS Settings tab in the domain’s control panel.
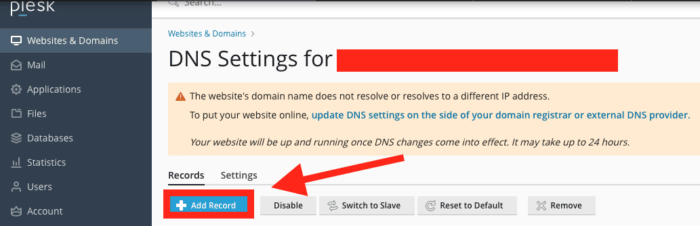
Step 2: Remove old MX records
Before adding the new MX records, we need to make sure all of the old MX records are removed. To do this, you simply select the box of the MX record and click remove located at the top of the page.
Step 3: Add new MX records
First things first, we will need to add the 5 Google Workspace MX records. Click the Add Record button and select MX as the record type.
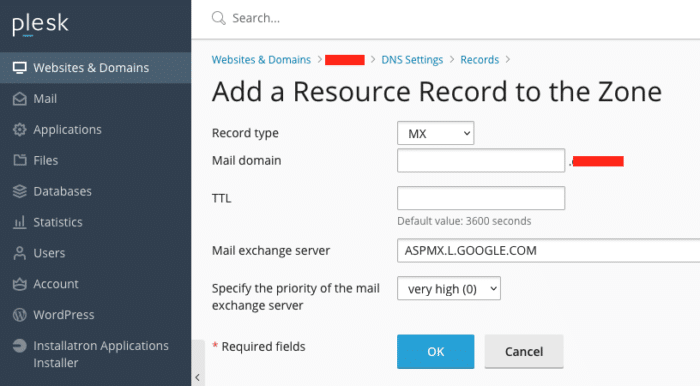
See the following table and add each record with the correct details:
| Name/Host/Alias | Time to Live (TTL*) | Record Type | Priority | Value/Answer/Destination |
| Blank or @ | 3600 | MX | 1 | ASPMX.L.GOOGLE.COM |
| Blank or @ | 3600 | MX | 5 | ALT1.ASPMX.L.GOOGLE.COM |
| Blank or @ | 3600 | MX | 5 | ALT2.ASPMX.L.GOOGLE.COM |
| Blank or @ | 3600 | MX | 10 | ALT3.ASPMX.L.GOOGLE.COM |
| Blank or @ | 3600 | MX | 10 | ALT4.ASPMX.L.GOOGLE.COM |
Once done you can click OK and move to the next step.
Step 4: Add the CNAME record
Once all the MX records are added, you need to add the CNAME record to verify your domain ownership with Google Workspace. Click the Add Record button and select CNAME as the record type.

Enter the following information in the corresponding fields:
- Name: Enter google
- Type: Select CNAME from the drop-down list.
- Value: Enter the unique Google Workspace verification code provided by Google Workspace. The code should be in the format of “googleXXXXXXXXXXXXXXXX” (without quotes).
Once done you can click OK
Step 5: Save and update the changes
Save the changes by clicking the Update button at the bottom of the page. This may take a bit before the settings are set in place.
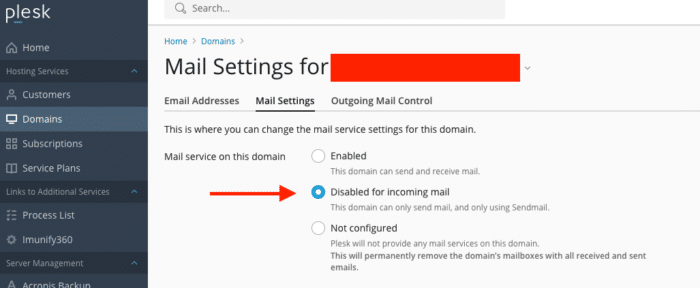
Step 6: Disable the Plesk mail server
To complete the setup procedure the only thing left to do is to disable the Plesk mail service. Navigate to the Mail tab on the main page of the domain, go to the Mail Settings and under Mail service on this domain set it on Disabled for incoming mail.
Conclusion
Congratulations! You have successfully set up the DNS records for Google Workspace in Plesk. It may take some time for the changes to take effect, so be patient. Once the DNS propagation is complete, you should be able to start using Google Workspace services with your domain.
Looking to save time and effort? Let us take care of tasks like these with our managed server options at Snel.com. Our team will handle all the necessary configurations and technical tasks, so you can focus on what’s important: running your business. Don’t waste your valuable time on server management – choose Snel.com for hassle-free solutions.

Leave a Reply