Introduction
You want to create additional users who will be able to log in to Plesk and have access to certain, predefined functionality. Such as: creating mailboxes, managing databases, or performing backups. The functionality available to additional users is determined by creating, configuring, and assigning user roles to additional users. In this article we will describe how to add a user to a Plesk server.
Prerequisites
- Active Cloud VPS, Pure Performance VPS or Dedicated Server with installed Plesk panel on it
Step 1. Login to your Plesk server
Go to your server domain or IP address. Plesk interface uses port 8443 for HTTPS connections and 8880 for HTTP connections.
Step 2. Add user to Plesk server
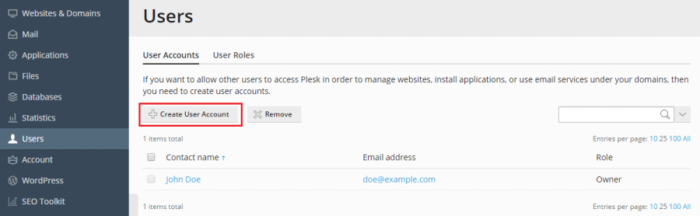
Go to Users > Create User Account.
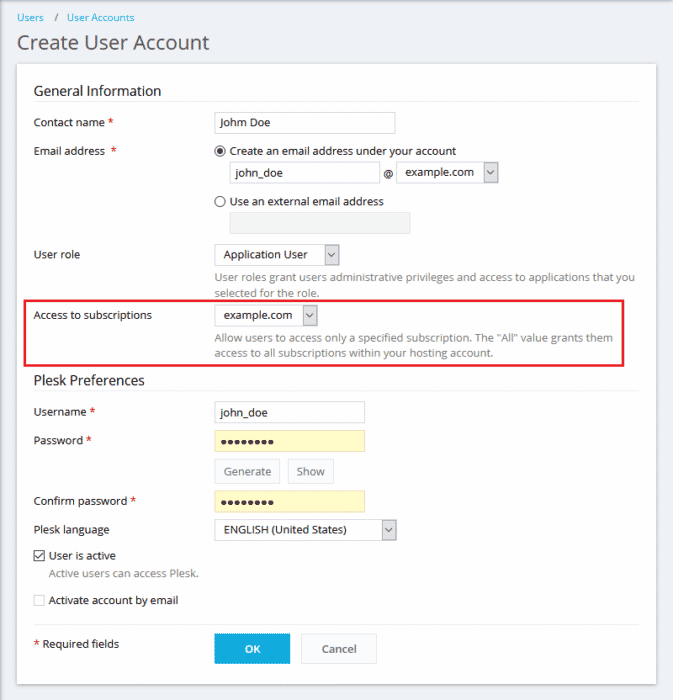
Specify the following:
- Contact name.
- Email address. The email address will be used as a user name for logging in to Plesk, unless you specify another name in the Username box. To create an email address for the user, type the desired left part of the address which goes before the @ sign, and, if you have a number of domains on your account, select the domain name under which the email address should be created.
- External email address. Specify an email that will be used to reset the password if the user loses access to their primary email address.
- User role. Select the required user role from the menu.
- Access to subscriptions. Allow a user to access only a specified subscription. The All value grants them access to all subscriptions within your customer account.
- Username. The user name for access to Plesk.
- Password. The password for access to Plesk.
Only active users can access Plesk. To make the user account active right after its creation, keep the User is active checkbox selected.
If you specified an external email address, you can also make the user account inactive until the user confirms the account. To do so, select the Activate account by email checkbox. The user will then receive the activation email in the external email address.
Click OK.
The user account was created. You can now add the user’s contact information if you want.
To add contact information to a user account:
- Click the contact name of an existing user account.
- Click Change Settings.
- Go to the Contact Details tab, specify the user’s contact information, and then click OK.
You can also notify the user about creation of his or her account and ability to access Plesk. Provide the user with the address to open in his or her browser, the username (which is the user’s email address), and the password that you specified in the account settings.
To remove a user account:
- Go to Users.
- Select a checkbox corresponding to the user account you want to remove, and click Remove. Note that you cannot remove your own account.
- Click Yes to confirm the removal.
You will need to provide details such as the user’s contact name, email, username, and password. You should pay particular attention to the following settings:
- User role. You need to select one of the pre-configured user roles from the menu to assign it to the user. User roles determine what Plesk functionality is available to the user once they log in. User roles are explained further in this topic.
- Access to subscriptions. If your customer account has more than one subscription assigned to it, you can enable the user to see and manage either all of them or a single subscription of your choice.
- User is active. If this checkbox is cleared, the user will be unable to log in to Plesk. By default the checkbox is selected. If you need to disable an additional user account without removing it, go to Users > User Accounts, click the user you want to disable, click Change Settings and clear the User is active checkbox.
User roles are used to define what Plesk functionality is available to additional users. Every additional user must have a user role assigned to them, and every role includes a set of permissions that determine what operations users who are assigned that role can perform in Plesk.
To create a user role, go to Users > User Roles and click Create User Role.
You will be presented with a list of permissions. For every permission, select either “Granted” or “Denied”. For every permission you mark as “Granted”, additional users assigned this role will be able to perform a number of particular operations. Note that the permissions included in user roles are overridden by the permissions configured on the subscription level. For example, if the hosting provider disables the Spam filter management permission for your subscription, neither the subscription owner nor any of the additional users they create will be able to change SpamAssassin settings, even if they are granted the Configure spam filter permission in their user role.
Step 3. Add extra user to an domain
How to add an additional user with an access to manage all subscriptions or a particular one?
- Log in to Plesk.
- Go to:
- for Service Provider view:Subscriptions > example.com > Users tab and click Create User Account.
- for Power User view:Users and click Create User Account.
- Fill in all the fields:
- select a user role, which determines what Plesk functionality will be available to this user
- select which subscription will be available for managing for this user (all or specific one)
Conclusion
In this article we have described how to add a user account to your Plesk server and how to assign different roles and privileges to the same. Also a we have provided extra information on how to add a user to specific domain name and provide a access to one subscription only.

Leave a Reply