Get Your Business Online: Create a WordPress Website in no time
Do you want to create a WordPress website? We have written this guide to helpt you do this! Installing and configuring a WordPress website is easier than you might think and can be accomplished in no time at all. In this help article, we’ll cover the basics of setting up your own WordPress website from start to finish so you can get your business online quickly. So let’s get started and learn how to create a WordPress website.
Step 1: Choosing a Domain Name and Hosting Service
The first step in creating your WordPress website is to choose a domain name and VPS plan. Your domain name is the address where users can access your website, while hosting service provides a place to store all your website’s files and content. At Snel.com, we offer various hosting packages with SSL included, tailored to suit your needs. You can choose from our VPS plans or opt for specific WooCommerce VPS hosting. Our WooCommerce hosting plans are specially optimized to make your website faster, more reliable and secure. Whatever your choice, we’ve got you covered when it comes to all
Step 2: Installing WordPress
Once you’ve chosen your domain name and hosting service, the next step is to install WordPress. We offer easy, one-click installation options for WordPress. Simply log into your clientarea and navigate to My Dashboard and click on Webhosting. From there, you’ll be able to install WordPress with just a few clicks. Find the full guide with screen grabs here.
If you have chosen the WordPress or WooCommerce hosting plan from Snel.com, we have already installed WordPress (and WooCommerce) for you. If you want to know how to login to them, follow this support article.
Once you’ve installed/found your (preinstalled) WordPress installation, you’ll be able to start customizing your site to fit your business needs. Whether you’re looking to create a blog or a WooCommerce webshop, WordPress is versatile enough to handle any type of website.
If you’re planning on using WordPress for a WooCommerce webshop, you may want to consider WooCommerce hosting. WooCommerce hosting is specifically designed to support the unique needs of an e-commerce site, including security and scalability.
Step 3: Choosing a Theme
Once you have your domain name and hosting set up, it’s time to choose a theme. A theme determines the overall look and feel of your website, so it’s important to choose one that fits your business and style.
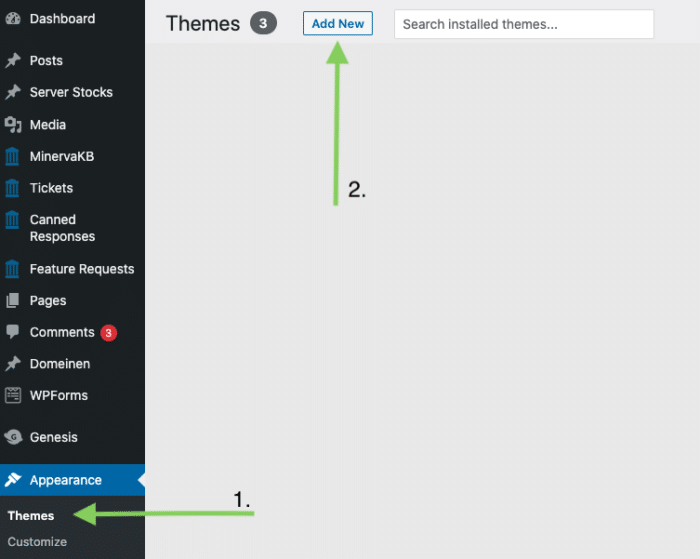
1 Go to the WordPress dashboard. Under Appearance click theme’s
2 Click “Add new”
When choosing a theme, you can browse through the WordPress theme directory or search for premium themes on websites that offer these. Many themes come with specific features, like compatibility with pagebuilders such as Elementor or Beaver builder, or with Woocommerce webshop integration, which is essential if you plan on selling products online.
It’s important to choose a theme that is responsive, meaning it will adjust to different screen sizes and devices. This ensures that your website looks great on desktops, laptops, tablets, and mobile phones.
Some themes come with built-in customization options, allowing you to easily change colors, fonts, and layouts. If you’re not comfortable with customization, look for themes that are designed with your specific industry in mind, such as a theme for a restaurant or photography website.
Once you have selected a theme for your WordPress website, it’s time to make it your own by customising it to reflect your brand and personality. Customisation is crucial because it will help your site stand out from the competition and create a cohesive user experience. Here are a few things you can do to customise your site:
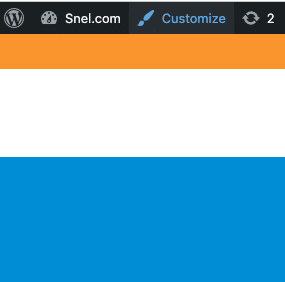
You will find the theme customiser in the upper left corner at the frontend of your WordPress webpage.
After you’ve clicked Customise you will be able to change several details of your WordPress website. Note that customisability depends strongly on the theme you choose. While some themes offer many tools to adjust your website to taste, others are very limited.
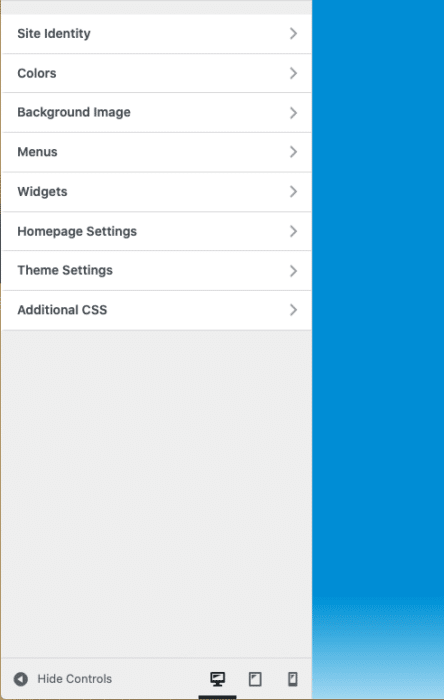
In general we would recommend you adjust the following settings to meet your companies Brand look and feel.
- Header and Footer: Your site’s header and footer are often the first and last things visitors see, respectively. Customising these elements will help you create a lasting impression and convey your message effectively. Consider using your brand’s colors and logo in these sections.
- Menus: Your site’s navigation should be easy to use and organized logically. WordPress provides an intuitive interface for creating menus, so make sure to create menus that are clear, concise, and user-friendly.
- Fonts: The fonts you choose for your website can have a big impact on its look and feel. You can select from a wide variety of fonts in WordPress, but be sure to choose fonts that are easy to read and match your brand’s style.
- Colors: The colors you choose for your website can help set the mood and evoke emotions in your visitors. Consider using a color scheme that aligns with your brand and enhances your message.
- Widgets: Widgets are small blocks of content that can be added to various sections of your website. You can use widgets to add social media links, contact forms, or even a search bar to your site.
- Background Images: Adding background images can create an eye-catching visual effect that complements your site’s content. You can choose from a wide variety of stock photos or use your own images to customise your site.
If you want to do heavy customising or you need functionality which you can’t create through the standard WordPress customiser you could consider using a page builder plugin such as WordPress own Gutenberg block editor, Elementor or Beaver builder.
Overall, customization is key to creating a WordPress website that reflects your brand and personality. Take the time to carefully consider each element and make sure it aligns with your message and style.
Step 4: Adding Pages and Posts
Once you have chosen a theme and customised the look and feel of your website, it’s time to start adding content. WordPress allows you to create two types of content: pages and posts.
Pages are static pages on your website that do not change often, such as an “About Us” a “Product page” page or a “Contact” page. Posts, on the other hand, are dynamic and displayed in reverse chronological order on your website, like a knowledge base or a blog.

To add a new page, navigate to “Pages” on the WordPress dashboard and click “Add New.” From there, you can add a title and content to your page. You can also add images, videos, and other media to your pages to make them more engaging.
To add a new post, navigate to “Posts” on the WordPress dashboard and click “Add New.” From there, you can add a title and content to your post, much like you would with a page. You can also add categories and tags to help organize your content.
It’s important to keep your content fresh and up-to-date to keep your visitors engaged. You should aim to publish new posts regularly and update your pages as needed. Consider creating a content calendar to help you stay organized and on track with your content creation.
WordPress also offers the ability to schedule posts to be published at a later date, which can be helpful if you want to create content in advance and have it automatically published on your website at a later time.
Overall, adding pages and posts to your WordPress website is a straightforward process that can be done quickly and easily. With some time and effort, you can create a website that is not only visually appealing but also full of informative and engaging content.
Step 5: Installing Plugins
One of the great things about WordPress is its vast selection of plugins. Plugins are essentially add-ons that enhance the functionality of your website. To install a plugin, simply navigate to the “Plugins” section of your WordPress dashboard and click “Add New.”
From there, you can search for specific plugins by name, or browse through popular plugins based on category. Before installing a plugin, it’s important to read its description, reviews, and compatibility information to ensure that it meets your needs and won’t cause any conflicts with your current website setup.
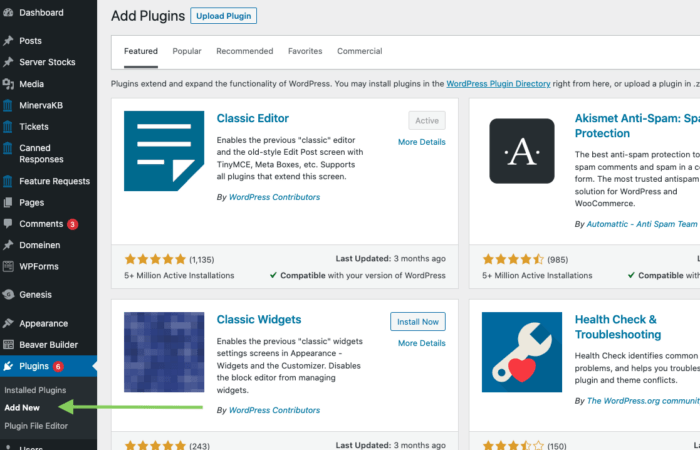
Once you’ve found a plugin you want to use, simply click “Install Now” and WordPress will take care of the rest. After installation, be sure to activate the plugin to start using its features on your website.
It’s important to note that too many plugins can slow down your website and potentially cause compatibility issues, so it’s best to only use plugins that are necessary for your website’s functionality and to regularly audit and remove any plugins that are no longer needed.
Some popular plugins include Yoast SEO for improving your website’s search engine optimisation, Jetpack for enhanced website security and performance, and WooCommerce for adding e-commerce functionality to your website. But the options are endless and can be tailored to your specific website needs.
By taking advantage of the vast selection of plugins available, you can customise and enhance your WordPress website to better serve your audience and business goals.
Step 6: Analytics & SEO
Setting up analytics and search engine optimisation (SEO) is essential for any website looking to reach their target audience. Analytics is tools track website traffic and provide valuable insights into visitor behavior. Examples of well known popular tools are
- Google Analytics
- Statcounter
- Piwik Pro
- Fathom Analytics
- Woopra
Once you have set up analytics, it’s time to focus on SEO. SEO helps improve your website’s visibility on search engines, making it easier for people to find you online. Here are a few tips for optimising your WordPress website for search engines:
1. Use a search engine-friendly URL structure that includes your main keywords.
2. Add descriptive meta tags and title tags to each page and post.
3. Use relevant and engaging content that incorporates your target keywords.
4. Optimise your images by using alt tags and compressing them for faster loading times.
5. Use internal linking to improve the user experience and make it easier for search engines to crawl your site.
6. Use a plugin like Yoast SEO to analyse your content and ensure it’s optimised for search engines.
Step 7: Ensure Proper Email Delivery from Your Website with a Post SMTP App
An often-overlooked aspect of your website is how it handles the sending of emails. When visitors fill out a contact form or create an account, it’s crucial that the emails they receive from your site are delivered in a reliable and professional manner. For this, you can install a Post SMTP plugin on your WordPress website.
This tool aids in making sure that the emails sent from your website actually reach the recipient, instead of getting lost in the spam or junk mail folder. To assist you with this task, we’ve prepared a step-by-step guide on how to install and configure a Post SMTP App. By adopting this solution, you are ensuring a better communication line with your site visitors, thus enhancing their overall experience.
Your website is ready to use
If you’ve followed all of the steps above, your WordPress website should be ready to be shared with the world. Don’t forget to regularly make backups, updates and to make sure your SSL certificate is still valid, so that your website and it’s users can have a safe online experience. If you have one of our Managed Plans such as WooCommerce hosting or Reseller hosting, your only worry is the maintenance of your content. We will keep an eye on your SSL certificate, updates, security and more and we will take action if needed.

Leave a Reply