Introduction
You have developed a WordPress site for your client on your PC and now you need to take it online. Or if you have a live site and you need to replicate it on your home machine for development. You can do this either manually or use a plugin for that.
In this tutorial, we will walk through both the manual and the plugin method of duplicating/migrating your WordPress site.
Prerequisites
- A source server with WordPress installed.
- A destination server (or your localhost environment) with LEMP Stack installed.
- Both source and destination servers are running Linux or WSL(Windows).
Manual Method
We will use WP-CLI for performing various tasks in our manual method.
Step 1: Install WP-CLI on both source and destination servers
Download the installer using the following command in your home directory.
$ wget https://raw.githubusercontent.com/wp-cli/builds/gh-pages/phar/wp-cli.phar
Make the installer executable.
$ chmod +x wp-cli.phar
Now, move it to /usr/local/bin directory to install.
$ sudo mv wp-cli.phar /usr/local/bin/wp
Check if it is installed properly.
$ wp --info
OS:     Linux 4.15.0-99-generic #100-Ubuntu SMP Wed Apr 22 20:32:56 UTC 2020 x86_64
Shell:  /bin/bash
PHP binary:     /usr/bin/php7.4
PHP version:    7.4.5
php.ini used:   /etc/php/7.4/cli/php.ini
WP-CLI root dir:        phar://wp-cli.phar/vendor/wp-cli/wp-cli
WP-CLI vendor dir:      phar://wp-cli.phar/vendor
WP_CLI phar path:       /home/user
WP-CLI packages dir:
WP-CLI global config:
WP-CLI project config:
WP-CLI version: 2.4.0
Step 2: Disable Cache Plugins
If you are using any cache-based plugins, it is best to disable them before attempting to move your site. You can also put the following code in your wp-config.php to do that.
define('WP_CACHE', false);Step 3: Create File and Database Backups
Create a Backup directory first.
$ mkdir ~/backups
Switch to your WordPress directory. You need to run all the WP-CLI commands from inside your WordPress directory.
$ cd /var/www/wordpress/html
Export your WordPress Database.
$ wp db export ~/backups/wp-source.sql --allow-root
Create a file backup.
$ tar -czf ~/backups/wordpress.tar.gz .
The dot at the end of the command means to extract the archive into the current directory.
Step 4: Move your Database and File Backups to Destination
First, create a directory to store the backups on your destination server.
$ mkdir ~/restore
Run the following command to copy over the files and database on the destination server.
$ scp [email protected]:~/backups/* ~/restore
Step 5: Restore File backup
Import the files.
$ sudo tar -xf ~/restore/wordpress.tar.gz -C /var/www/wordpress/html --exclude=wp-config.php
Here we have excluded the wp-config.php file since we will create a fresh one at the destination with fresh values for the database server.
Change ownership of the installation to the current user so that we can perform the upcoming commands.
$ sudo chown user:user -R /var/www/wordpress/html
Step 6: Restore Database Backup
The first step here is to create a fresh wp-config.phpfile. We can do this via the WP-CLI utility.
$ cd /var/www/wordpress/html
$ wp config create --dbname=wordpress --dbuser=wordpressuser --dbpass=passw0rd
If you are creating a staging/development environment, then you can add additional parameters via the same command as follows. You can also enter any optional PHP code you want to insert in the config file.
$ wp config create --dbname=wordpress --dbuser=wordpressuser --dbpass=passw0rd --dbprefix=_newwp --extra-php <<PHP
define( 'WP_DEBUG', true );
define( 'WP_DEBUG_LOG', true );
PHP
Before restoring the database, we need to create a new one into which it will be restored.
To do that, log in to MySQL prompt.
$ sudo mysql -u root -p
Run the following commands on the MySQL prompt.
CREATE USER wordpressuser@localhost IDENTIFIED BY 'passw0rd';
CREATE DATABASE wordpress;
GRANT ALL PRIVILEGES ON wordpress.* TO wordpressuser@localhost;
quit;
Replace the database name, username and password with the ones you used to create the config file.
Import the database.
$ wp --quiet db import ~/restore/wp-source.sql
You can omit the –quiet option if you want a verbose output.
Step 7: Configure the Destination WordPress
It is time to change the URL of your site. We will do a test run first to see if it works properly before implementing the change.
Run the following command to do a dry run for changing the URL of the site.
$ wp search-replace oldwp.com newwp.com --dry-run --allow-root
If it looks good, then run the command again without the –dry-run option. You can ignore any warnings related to skipping an uninitialized class.
$ wp search-replace oldwp.com newwp.com --allow-root
We need to change ownership of the WordPress install to make it work with Nginx. In our case, the old installation was owned by www-data but the new installation is to be owned by nginx user.
$ sudo chown -R nginx:nginx /var/www/wordpress/html
Fix the directory and file permissions.
$ sudo find /var/www/wordpress/html -type f -exec chmod 644 {} +
$ sudo find /var/www/wordpress/html -type d -exec chmod 755 {} +
Open up the new URL and your site should load properly.
If you are using SSL, you will need to install SSL at your destination server before launching the site.
Plugin Method
In this method, we will use the Duplicator plugin. There are other plugins as well which you can use.
Step 1: Install and Configure Duplicator
Install and activate the Duplicator plugin.
Make sure your Duplicator settings are working fine. To do that, go to Duplicator >> Settings in your WordPress admin panel. You will notice the full path of the wp-snapshots folder mentioned under the Storage section which was created automatically on activating the plugin. Make sure it exists on your server.
Next, visit Packages Tab in settings and make sure the plugin has detected the correct path to mysqldump.
Step 2: Create Package
Go to Duplicator >> Packages and click the Create New button on the top right.
Your package will be named automatically. It will also check for system requirements and let you know if there is an issue before you can proceed.
Click on the Archive dropdown where you can filter out files or directories you don’t want to copy. You can also leave out certain database tables if you want to.
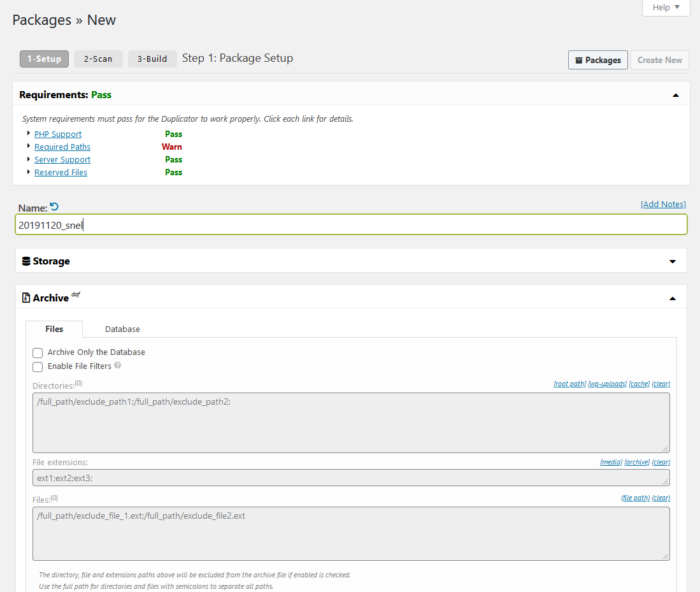
You will get a Requirements box with a warning if there’s an issue. You should resolve them before proceeding.
Click on the Installer dropdown and fill the MySQL server values of the destination if they are different than your current host.
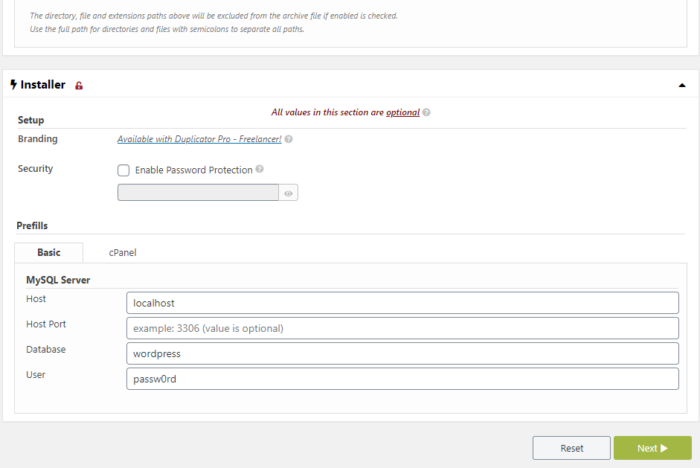
Click Next when finished to proceed to the second screen.
Duplicator will then scan your website and inform you of any issue before building a package.
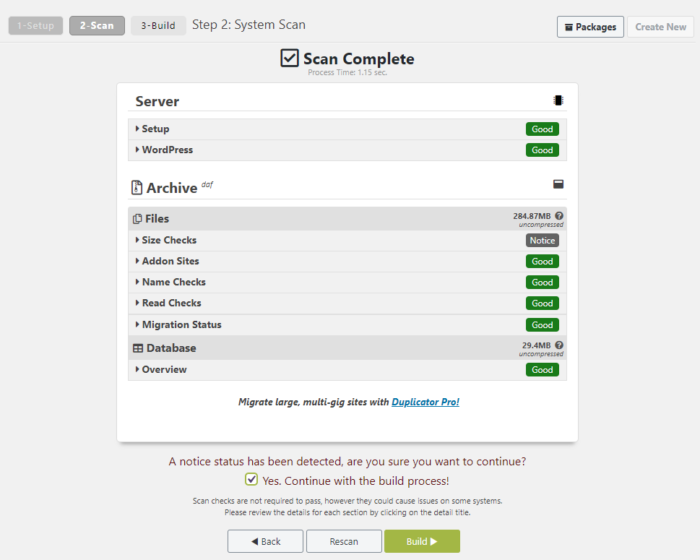
If you are satisfied, tick the box against Yes and click on the Build button to proceed
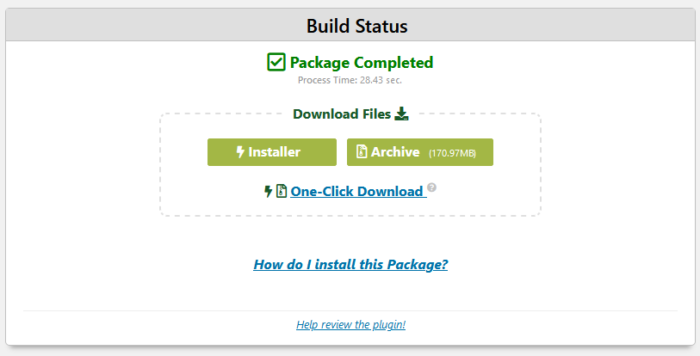
Now, wait while the plugin builds your package. Once the package is built, download both the installer and the Archive file. You can also use the One-Click Download button to download both files at once.
Step 3: Install WordPress at Destination
Copy over the installer from the source server to the destination. Upload it and run the installer.php script. You will get the following screen.
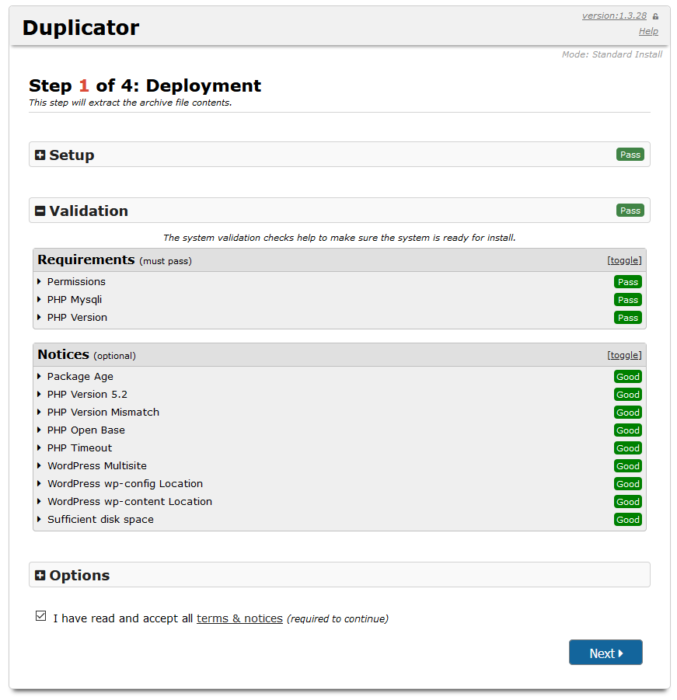
Agree to the Terms and Click Next to proceed. Depending on the size of your WordPress site, it might take some time for the plugin to finish the process.
Next, you will be asked to fill the database details. Click the Test Database button to make sure everything is okay. Click Next when finished.
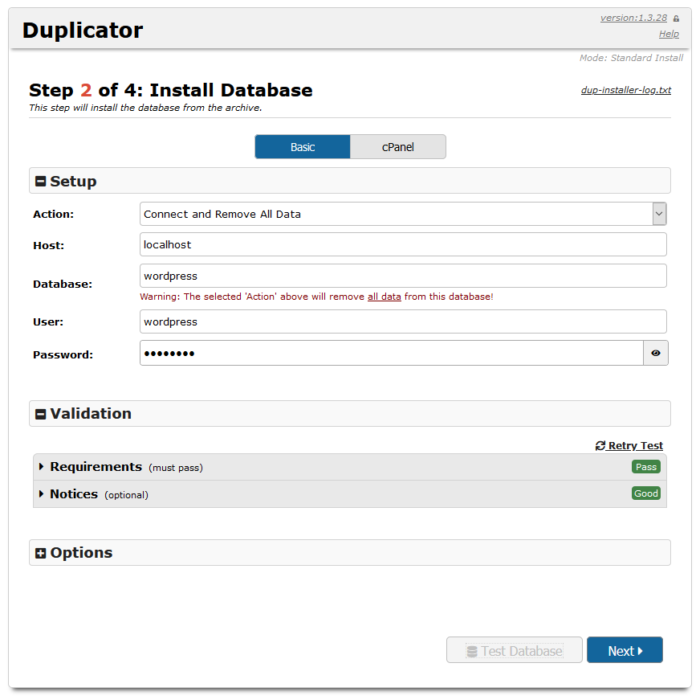
Next, you will be asked to confirm the settings once again. Click Ok to proceed.
On the next screen, you can create a new user account which is optional. You can also select which plugins to activate and perform basic operations related to Cache and Admin SSL on wp-config.php.
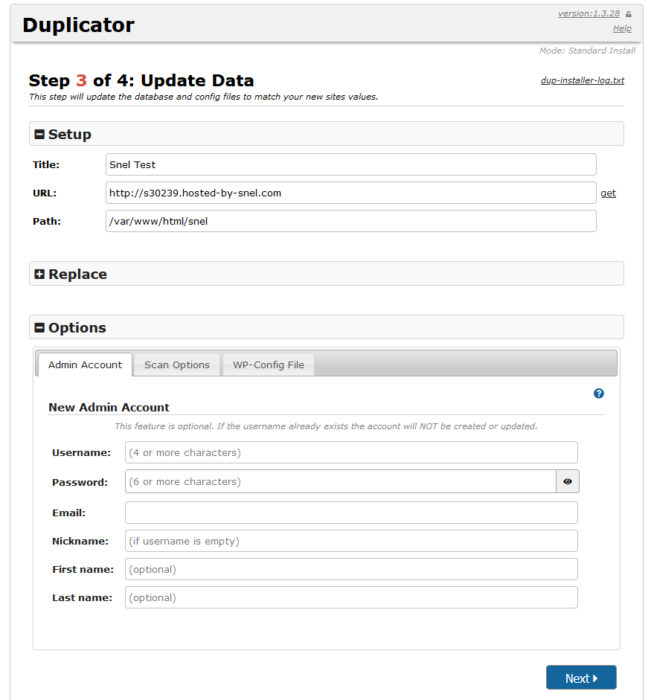
When you are done making changes, click Next to proceed.
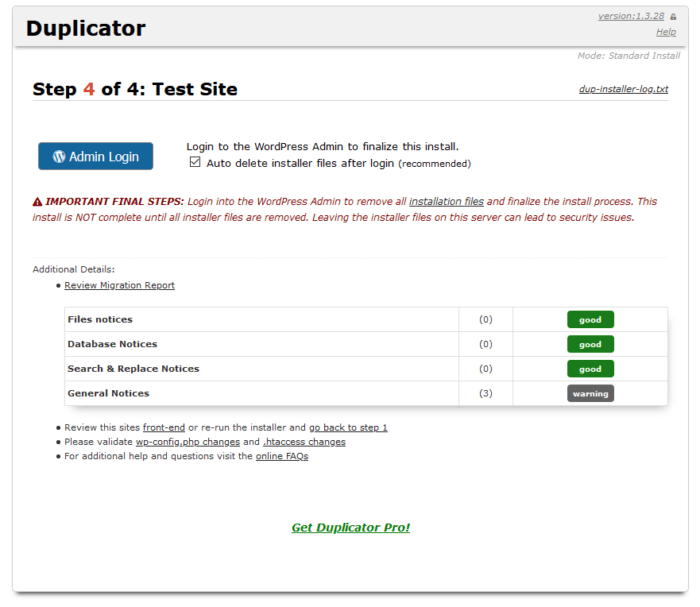
This is the final step where you can review any issues or flags which the plugin will raise. You can read about them by clicking on the Review Migration Report link. Once you have tended to the issues, click on the Admin Login button. If you want to keep the installer, you can uncheck the option “Auto delete installer files after login”. It is not recommended though.
Once you are logged in, you might get a notice to remove the installer files again incase the plugin wasn’t able to.

Click on the link and you will be greeted with the following screen.
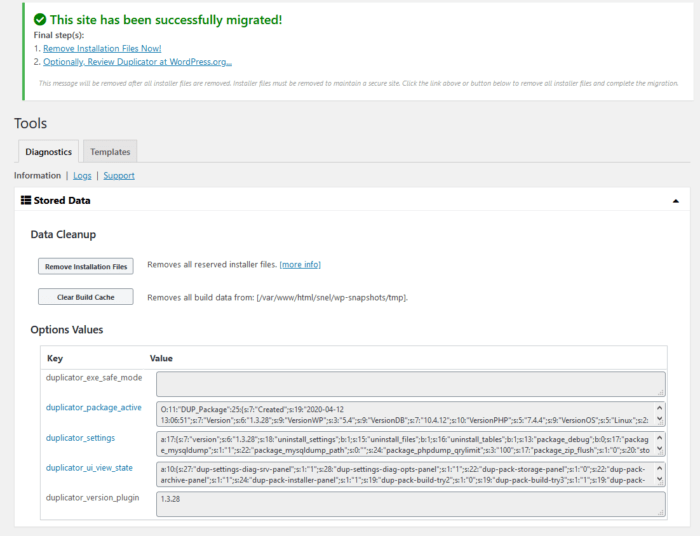
Remove both the installation files and the cache by using the respective buttons.
Conclusion
This should finish your migration and now you are ready to use your WordPress install at your new location.


Leave a Reply