Introduction
With VNC you can use a graphical desktop environment remotely. This article will help you install and configure the graphical desktop environment and VNC on your server.
Prerequisites
- A server with a default installation of Ubuntu 16.04 and setup using our Initial Server Setup with Ubuntu 16.04 article
- An administrative non-root user as created in the Initial Server Setup with Ubuntu 16.04 article
- A VNC client, for Windows we recommend TightVNC, with macOS the builtin “Screen Sharing” app works great and Linux users can use many options including TightVNC.
Step 1: Log in to your server
Log in as an administrative non-root user
Step 2: Update all packages
sudo apt-get update && sudo apt-get -y dist-upgrade
Step 3: Install the graphical desktop environment and VNC server
Ubuntu is installed without a graphical desktop environment by default. There are lots of desktop environments available, we will install Gnome:
sudo apt-get install ubuntu-desktop gnome-panel gnome-settings-daemon metacity nautilus gnome-terminal tightvncserver
This will install a complete desktop environment including an office suite and web browser. If you prefer a minimal install using the following command:
sudo apt-get install --no-install-recommends ubuntu-desktop gnome-panel gnome-settings-daemon metacity nautilus gnome-terminal tightvncserver
Step 4: Configure VNC server
We start by setting a password for the VNC server. Therefore we need to start the VNC server with:
vncserver
You will be asked to enter and verify a password. We would advise using the same password as for your user. The view-only password is optional and could be used to give someone access to your screen without allowing him to move your mouse and type with the keyboard. By starting VNC server default configurations are created. We want to update our configuration, therefore we first stop the VNC server by issuing the following command:
vncserver -kill :1
Now it’s time to move the old startup configuration to a safe place and create an empty startup configuration:
mv ~/.vnc/xstartup ~/.vnc/xstartup.old; touch ~/.vnc/xstartup
Next, open the startup configuration file with your favorite text editor:
nano ~/.vnc/xstartup
Copy and paste the following so that the contents of that file match with the following:
#!/bin/sh
[ -x /etc/vnc/xstartup ] && exec /etc/vnc/xstartup
[ -r $HOME/.Xresources ] && xrdb $HOME/.Xresources
xsetroot -solid grey
x-window-manager &
gnome-session &
gnome-panel &
gnome-settings-daemon &
metacity &
nautilus &
We will now grant it the proper privileges to this file to ensure it will work correctly
chmod +x ~/.vnc/xstartup
After you’re done editing the startup configuration file save and exit (CTRL+W for nano). Next, we configure the VNC server configuration file, open the configuration file:
nano ~/.vnc/tightvncserver.conf
Copy and paste the following so that the contents of that file match with the following:
$geometry = "1280x720";
$depth = 24;
Replace 1280×720 with the resolution you would like to have like 1920×1080 for instance.
Step 5: Setup VNC server to start at boot
We start VNC server at boot by creating a service file for it and enabling the service. Start by creating a new configuration file for the service:
sudo nano /etc/systemd/system/[email protected]
The content should match the following. Remember to edit your username:
[Unit]
Description=Remote desktop service (VNC)
After=syslog.target network.target

[Service]
Type=simple
User=johnny
PAMName=login
PIDFile=/home/johnny/.vnc/%H:%i.pid
ExecStartPre=/bin/sh -c '/usr/bin/vncserver -kill :%i > /dev/null 2>&1 || :'
ExecStart=/usr/bin/vncserver :%i
ExecStop=/usr/bin/vncserver -kill :%i

[Install]
WantedBy=multi-user.target
Save and exit (CTRL+W). Next reload the service definitions by issuing the following command:
sudo systemctl daemon-reload
Next, we start the VNC server:
sudo systemctl start vncserver@1
Next, we make sure the VNC server is started when the server is started:
sudo systemctl enable vncserver@1
Step 6: Connect with Windows
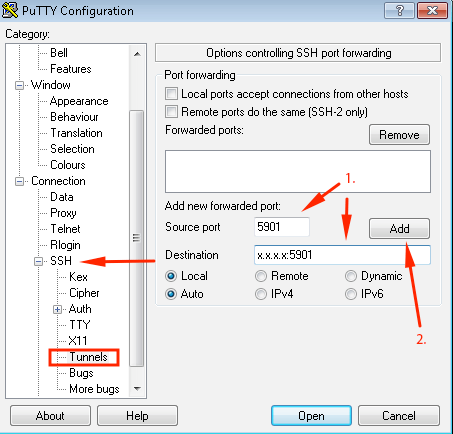
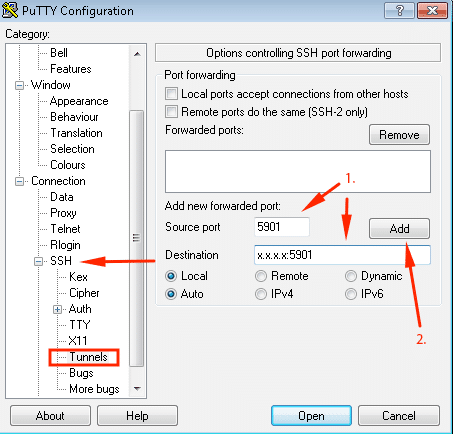
First, create a secure tunnel over SSH before connecting to the VNC server. You can create a tunnel by connecting to your server with PuTTY as follows. First setup the tunnel under “Connection” -> “SSH” -> “Tunnels” by entering “5901” in “Source port” and “x.x.x.x:5901” (replace x.x.x.x with the IP address of your server) in “Destination” (1) and then clicking “Add” (2):
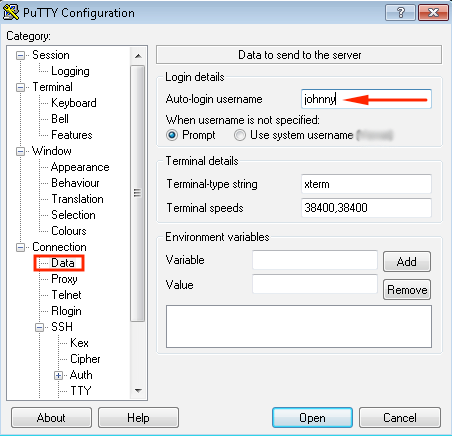
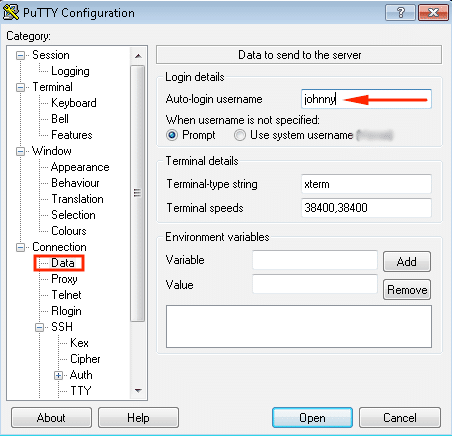
Next click on “Connection” -> “Data” and fill in your username (replace johnny with your username) under “Auto-login username”:
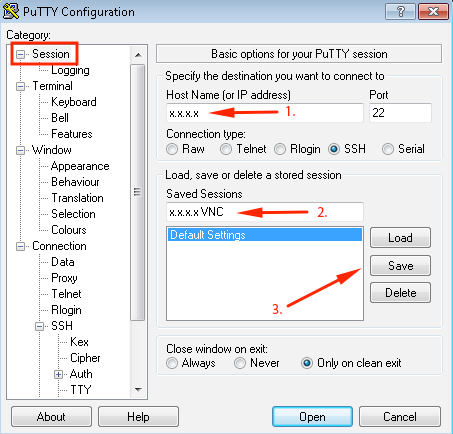
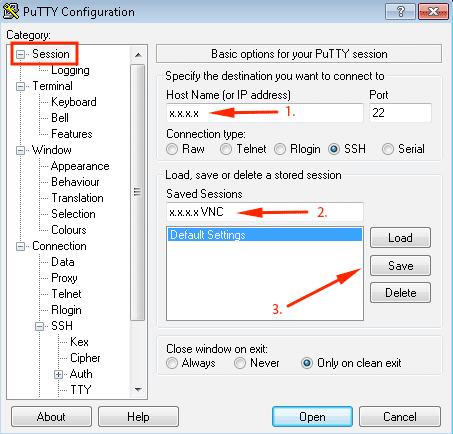
Next click on “Session” and enter the IP address of your server under “Host Name (or IP address)” (1), enter a descriptive name under “Saved Sessions” (2) and click on “Save” (3).
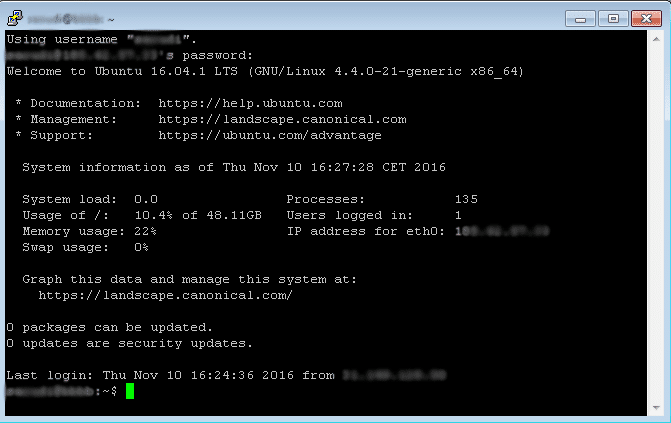
Whenever you want to connect with VNC to your computer we recommend you to start PuTTY and double click on “x.x.x.x VNC” in the main screen with the list with saved sessions under “Default Settings”. You will be asked for your SSH password, enter your password and hit “Enter”. At this moment the PuTTY prompt on your server should be shown:
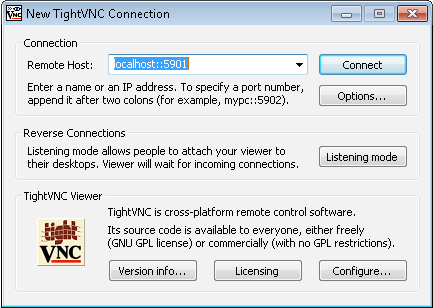
Don’t close PuTTY, you can minimize the window if you like. Next, it’s time to start your VNC client. Start TightVNC and on the main screen fill in “localhost::5901” (note the 2 colons!) next to “Remote Host:” and click on “Connect”:
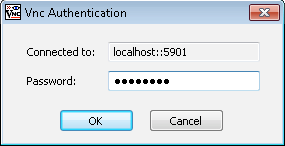
You will be asked for a password, enter your VNC password and click on “OK”:
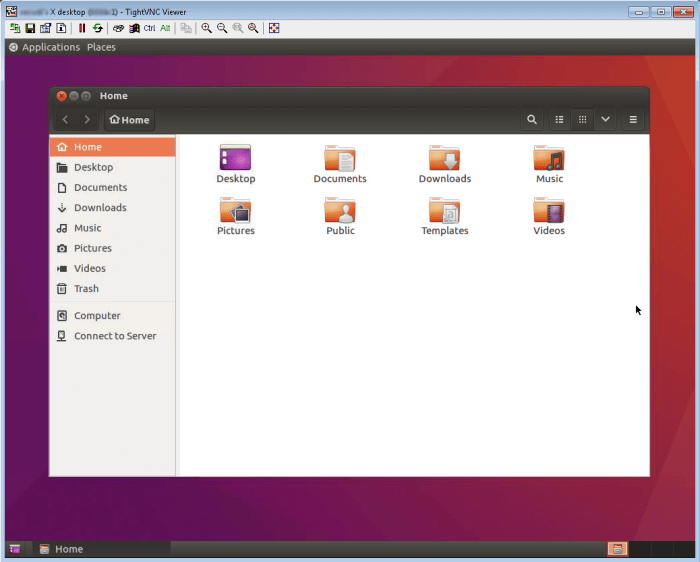
You are connected:
If you want to close the connection close the VNC client and disconnect from SSH by typing exit in PuTTY.
Step 7: Connect with macOS and Linux
Again we setup the SSH tunnel first. Open up your terminal and connect with: ssh -L 5901:127.0.0.1:5901 [email protected]
Replace johnny with your username and x.x.x.x with the IP address of your server. After hitting “Enter” you will be asked for your password, enter your SSH password and hit “Enter”, you will be connected with SSH. Leave this running. Next, start your VNC client (we start the native Screen Sharing app from macOS) and enter “localhost:5901” as the host to connect to and click on “Connect”:
You will be asked for a password, type in your VNC password, tick “Remember this password in my keychain” if you prefer and click on “Connect”:
You are connected:
If you want to close the connection close the VNC client and disconnect from SSH by typing exit in your terminal.
Conclusion
Congratulations! You have successfully installed VNC on Ubuntu 16.04.



Hi
I was following your instructions but I think I went a bit off track when trying to do :-
"sudo nano /etc/systemd/system/[email protected]"
What should the file look like ?
Newbie
Hi Nelson,
Could you provide me the current content of that specific file?
Step 5 is updated with correct info, seems like the content got mangled by the code processor.
when i try to run the command on step five i got:
sudo systemctl start vncserver@1
Failed to start [email protected]: Unit [email protected] is not loaded properly: Invalid argument.
this is wha i pasted on my [email protected] (myuser is just an example)
Unit]
Description=Remote desktop service (VNC)
After=syslog.target network.target [Service]
Type=simple
User=myuser
PAMName=login
PIDFile=/home/myuser/.vnc/%H:%i.pid
ExecStartPre=/bin/sh -c ‘/usr/bin/vncserver -kill :%i > /dev/null 2>&1 || :’
ExecStart=/usr/bin/vncserver :%i
ExecStop=/usr/bin/vncserver -kill :%i [Install]
WantedBy=multi-user.target Save and exit (CTRL+W). Next reload the service definitions by issuing the following command:
Hi Francisco,
I will ask our support department to look into step 5 and update the article. There seems to be a problem between the code and text that got mixed up.
Step 5 is updated with correct info, seems like the content got mangled by the code processor.
thanks guys for the help. everything is right now.
just a lil question. how to enable shared clipboard betwen tighvnc and my pc?
Did you try those steps already:
1. install `sudo apt-get install autocutsel`
2. Run nano ~/.vnc/xstartup and add this line:
autocutsel -fork
like this:
#!/bin/sh
[ -x /etc/vnc/xstartup ] && exec /etc/vnc/xstartup
[ -r $HOME/.Xresources ] && xrdb $HOME/.Xresources
xsetroot -solid grey
x-window-manager &
gnome-session &
gnome-panel &
gnome-settings-daemon &
metacity &
nautilus &
autocutsel -fork
3. Restart vncserver
Hi, even I have the same question, I am not able to copy from my PC to VNC even after adding that line.
I am able to copy from VNC to my PC works,
Any solution ?
I've installed via the above instructions. I'm using minal Gnome Panel (Ubuntu) on a Mac. Do you know a keystroke to expand the Applications Drop Down menu? Command+A does not work.
Thank you!
Hello,
I have an Ubuntu Server 16.04 instance set up via AWS EC2 console and I am using OSX Terminal to enter all of these commands. I have no trouble connecting to the instance using Command line, but I cannot seem to get the VNC and desktop to work.
I have followed all of these instructions for setting up desktop and vnc4server, but when I try to connect via VNC I keep getting the message "Couldn’t get a file descriptor referring to the console." Any idea what is going wrong here?
Hi. I followed the instructions above. When I try to connect, I am prompted for the password, then I briefly see a desktop, and then it disappears. Any thoughts?
Hello Philippe, this article is deprecated since ubuntu 16.04 is EOL. We do not have an answer to your issue.