Introduction
In this article, we will describe how you can configure the incoming spam filter of SpamAssassin in Plesk. SpamAssassin in combination with ClamAV is considered a standard setup to protect against viruses and spam. These articles will help with installing and configuring both.
Prerequisites
- A VPS, Budget Dedicated Server or Dedicated Server running Plesk Obsidian control panel
- SSH root access to the server
Step 1: Log in using SSH
You must be logged in via SSH as sudo or root user. Please read this article for instructions if you don’t know how to connect.
Step 2: Install SpamAssassin
plesk installer --select-release-current --install-component spamassassin
Step 3: Configure SpamAssassin
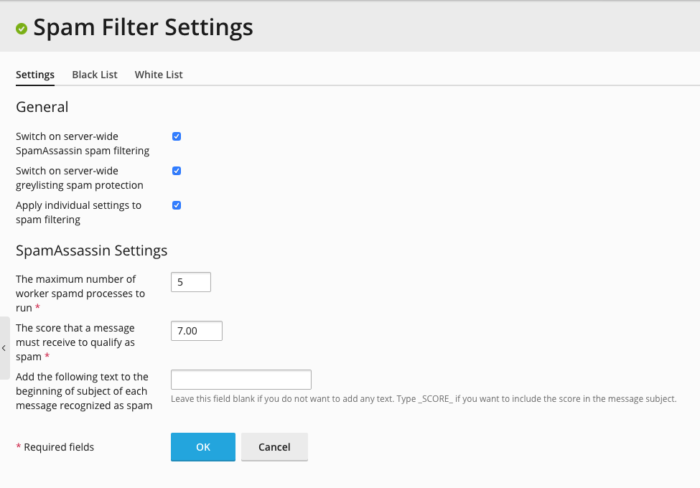
Log in to your Plesk server. On the left pane, click Tools and Settings. View tab Mail and open the Spam Filter settings by clicking on Spam Filter.
Enable “Switch on server-wide SpamAssassin spam filtering”
Enable “Switch on server-wide greylisting spam protection” (highly recommended)
Enable “Apply individual settings to spam filtering”
Make following field blank: “Add the following text to the beginning of subject of each message recognized as spam”
Save by clicking on OK

Step 4: Enable SpamAssassin by default for new users (optional but recommended)
Create a new script on your server which will be called upon mailbox creation. This script will enable SpamAssassin and change the default action of rewriting the subject to moving the mail to the Spam folder. We will save this script as /usr/local/sbin/plesk_event_mail_create_post.sh
cat <<'EOF' > /usr/local/sbin/plesk_event_mail_create_post.sh
#!/bin/bash

# Enable SpamAssassin
plesk bin spamassassin -u ${NEW_MAILNAME} -status true
plesk bin spamassassin -u ${NEW_MAILNAME} -action move
EOF
Make this script executable:
chmod 700 /usr/local/sbin/plesk_event_mail_create_post.sh
Now go to Plesk. On the left pane, click Tools and Settings. View tab Tools & Resoucres and click on Event Manager. On the next page click on the button + Add Event Handler. On the next page select the option Mail account created as Event. In the field at Command you enter /usr/local/sbin/plesk_event_mail_create_post.sh
Save by clicking on OK.
From now on whenever a new mail account is created the script /usr/local/sbin/plesk_event_mail_create_post.sh will enable SpamAssassin and change the setting for that user to move spam to the Spam folder.
Step 5: Enable SpamAssassin for all existing users (optional but recommended)
If you want the same settings for all existing mail accounts on your Plesk server just run the following as root in SSH:
for mailbox in $(plesk db -Ne"select concat(m.mail_name,'@',d.name) as email from mail as m left join domains as d on m.dom_id=d.id"); do
plesk bin spamassassin -u $mailbox -status true;
plesk bin spamassassin -u $mailbox -action move;
done
Step 6: Disable greylisting for domains by default
Create a new script that we will use to disable greylisting during domain creation. We will save the script as /usr/local/sbin/plesk_event_domain_create_post.sh:
cat <<'EOF' > /usr/local/sbin/plesk_event_domain_create_post.sh
#!/bin/bash

# Disable greylisting
plesk bin grey_listing -ud ${NEW_DOMAIN_NAME} -status off
EOF
Make this script executable:
chmod 700 /usr/local/sbin/plesk_event_domain_create_post.sh
Create two new handlers.
- Default domain (the first domain added to a subscription) created
- Domain created
In the command field enter /usr/local/sbin/plesk_event_domain_create_post.sh
Conclusion
Congratulations, you have now configured incoming spam filters with SpamAssassin.


Leave a Reply