Privacy settings
Decide which cookies you want to allow. You can change these settings at any time. However, this can result in some functions no longer being available. For information on deleting the cookies, please consult your browser’s help function. Learn more about the cookies we use.
With the slider, you can enable or disable different types of cookies:
This website will
- Remember which cookies group you accepted
This website won't
- Remember your login details
- Essential: Remember your cookie permission setting
- Essential: Allow session cookies
- Essential: Gather information you input into a contact forms newsletter and other forms across all pages
- Essential: Keep track of what you input in a shopping cart
- Essential: Authenticate that you are logged into your user account
- Essential: Remember language version you selected
- Functionality: Remember social media settings
- Functionality: Remember selected region and country
- Analytics: Keep track of your visited pages and interaction taken
- Analytics: Keep track about your location and region based on your IP number
- Analytics: Keep track of the time spent on each page
- Analytics: Increase the data quality of the statistics functions
- Advertising: Tailor information and advertising to your interests based on e.g. the content you have visited before. (Currently we do not use targeting or targeting cookies.
- Advertising: Gather personally identifiable information such as name and location
This website will
- Essential: Remember your cookie permission setting
- Essential: Allow session cookies
- Essential: Gather information you input into a contact forms newsletter and other forms across all pages
- Essential: Keep track of what you input in a shopping cart
- Essential: Authenticate that you are logged into your user account
- Essential: Remember language version you selected
This website won't
- Remember your login details
- Functionality: Remember social media settings
- Functionality: Remember selected region and country
- Analytics: Keep track of your visited pages and interaction taken
- Analytics: Keep track about your location and region based on your IP number
- Analytics: Keep track of the time spent on each page
- Analytics: Increase the data quality of the statistics functions
- Advertising: Tailor information and advertising to your interests based on e.g. the content you have visited before. (Currently we do not use targeting or targeting cookies.
- Advertising: Gather personally identifiable information such as name and location
This website will
- Essential: Remember your cookie permission setting
- Essential: Allow session cookies
- Essential: Gather information you input into a contact forms newsletter and other forms across all pages
- Essential: Keep track of what you input in a shopping cart
- Essential: Authenticate that you are logged into your user account
- Essential: Remember language version you selected
- Functionality: Remember social media settings
- Functionality: Remember selected region and country
This website won't
- Remember your login details
- Analytics: Keep track of your visited pages and interaction taken
- Analytics: Keep track about your location and region based on your IP number
- Analytics: Keep track of the time spent on each page
- Analytics: Increase the data quality of the statistics functions
- Advertising: Tailor information and advertising to your interests based on e.g. the content you have visited before. (Currently we do not use targeting or targeting cookies.
- Advertising: Gather personally identifiable information such as name and location
This website will
- Essential: Remember your cookie permission setting
- Essential: Allow session cookies
- Essential: Gather information you input into a contact forms newsletter and other forms across all pages
- Essential: Keep track of what you input in a shopping cart
- Essential: Authenticate that you are logged into your user account
- Essential: Remember language version you selected
- Functionality: Remember social media settings
- Functionality: Remember selected region and country
- Analytics: Keep track of your visited pages and interaction taken
- Analytics: Keep track about your location and region based on your IP number
- Analytics: Keep track of the time spent on each page
- Analytics: Increase the data quality of the statistics functions
This website won't
- Remember your login details
- Advertising: Tailor information and advertising to your interests based on e.g. the content you have visited before. (Currently we do not use targeting or targeting cookies.
- Advertising: Gather personally identifiable information such as name and location
This website will
- Essential: Remember your cookie permission setting
- Essential: Allow session cookies
- Essential: Gather information you input into a contact forms newsletter and other forms across all pages
- Essential: Keep track of what you input in a shopping cart
- Essential: Authenticate that you are logged into your user account
- Essential: Remember language version you selected
- Functionality: Remember social media settings
- Functionality: Remember selected region and country
- Analytics: Keep track of your visited pages and interaction taken
- Analytics: Keep track about your location and region based on your IP number
- Analytics: Keep track of the time spent on each page
- Analytics: Increase the data quality of the statistics functions
- Advertising: Tailor information and advertising to your interests based on e.g. the content you have visited before. (Currently we do not use targeting or targeting cookies.
- Advertising: Gather personally identifiable information such as name and location
This website won't
- Remember your login details


Surely there is some steps missing here? at the end of step 2
Andry, thanks for the information. We will update this article asap.
Andy, it's a bit late but we added the missing part at the end of step 2.
But you never did…?
What did we not do?
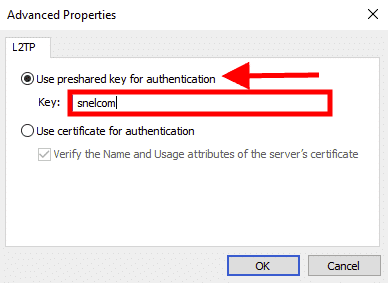
Preshared key entry for one thing
Thanks, we will update our article.
Hi Todd,
The missing part at the end of step 2 with the preshared key is added.
Hello, what needs to be changed at the end of step 2, it says "click Change Adapter Settings" but does not list settings… i went through the whole instruction set, and i can connect with a Mac OS client, but not windows… not sure why…
Hey Nick,
It came to my attention that some steps were missing at the end of step 2 which is added now. You should now be able to use this article to connect.
Keep getting the error 'LT2P Connection attempt failed because the security layer encountered a processing error during intial negotiations with the remote computer'.
In Step 2, near "Open Security tab" you can configure the security layer. I would start debugging from there.
after i connected to the vpn from my windows 10 machine, i could no longer use the internet – i cannot browse or access my email. how do allow access? i will probably find an answer searching around, but showing a solution to this problem would be a nice bonus.
Did you configure the server-side? You have to enable network traffic you can check our article here:
https://www.snel.com/support/how-to-set-up-an-l2tp-ipsec-vpn-on-windows-server-2019/
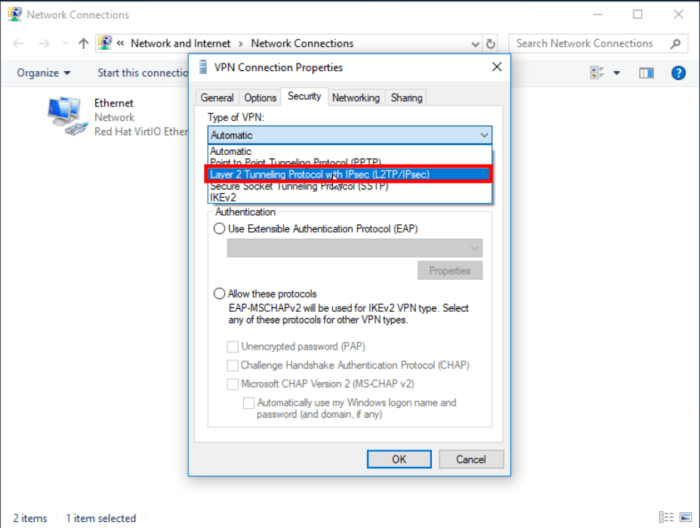
On step 2 configure VPN
I think we should type the VPN Server ip address.
Let me know if I made mistakes.
That's correct!
Hi there, do we need to setup port forwarding on the router.
i tried the above steps and didnt went through
It depends on your configuration. Our articles are written based on our network setup.
trouble with your network setup with this article is that you appear to have created a VPN network connection on a local network. Not entirely useless but less useful (not many people are trying to hide from other people on their own network). Incredible article though.
You must be young, please consider that the purpose of this type of VPN is to give access to a remote user (not on the same network) access to your network resources. That would mean the server is behind an internet-facing router. I'm sure the firewall settings for any router is easy and your reservation is unnecessary to simply say UDP 1701, 500, and 4500 need to be directed to the 2019 VPN server. But those aren't right either. maybe with all your article writing wisdom you can get your spirit to look a tiny bit deeper and answer the question so this impressive couple of articles can be useful to more than people testing this out.
🙂 said with love
> trouble with your network setup with this article is that you appear to have created a VPN network connection on a local network
This is not true, this connection has been made to a public IPv4 address (see screenshot).
> your reservation is unnecessary to simply say UDP 1701, 500, and 4500 need to be directed to the 2019 VPN server.
This article is not about Windows Server 2019.
Are you sure you're replying to the correct article?
Keep getting the error 'LT2P Connection attempt failed because the security layer encountered a processing error during intial negotiations with the remote computer'
Ever found the solution to this error?