Introduction
This guide will help you set up our Secondary DNS Services in your cPanel/WHM control panel. By the end of this tutorial, you will be able to manage your DNS records via your control panel. For more information about our Secondary DNS Services please click here.
Prerequisites
- Installed cPanel/WHM control panel
- Snel.com – Secondary DNS Services
- You need to have the SSH login details of your server ready
- You need to have the root login details of your cPanel/WHM Ready
- This article is written for cPanel with BIND
Step 1 – Log in to cPanel/WHM
Log in to your cPanel/WHM environment https://cpanel.example.com:2087

Step 2 – Nameserver Selection
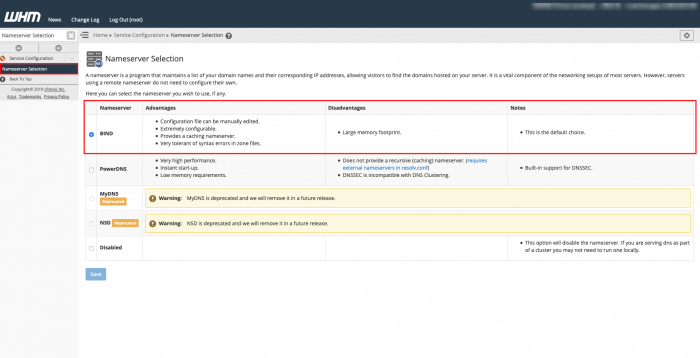
In this article, we are using BIND as nameserver. In this step, we will check if BIND is selected. You can find this under Service Configurationand select Nameserver Selection. The configuration should be similar to this one.
Step 3 – Configure nameservers
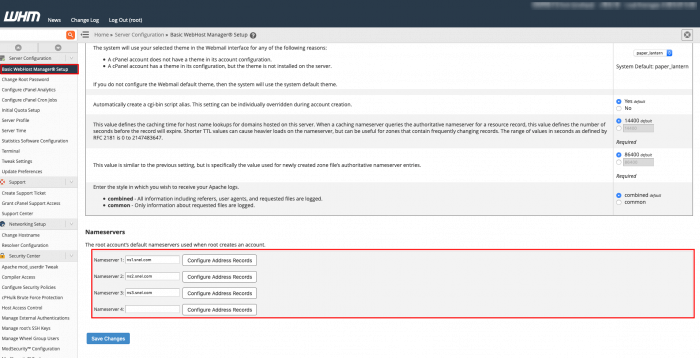
Find Basic WebHost Manager® Setupunder Server Configuration. The nameserver should be configured as followed:
Nameserver 1 = ns1.snel.com
Nameserver 2 = ns2.snel.com
Nameserver 3 = ns3.snel.com
Step 4 – Log in with SSH
You need to log in as root or a user with root privileges. You can check this article for instructions on how to log in using SSH.
Step 5 – Configure BIND on the server
In order to apply the changes from cPanel to the nameservers of Snel.com, you need to make changes in the following configuration file /etc/named.conf. In the configuration file find the options section which should be similar to the configuration below:
options {
    /* make named use port 53 for the source of all queries, to allow
         */
    // query-source    port 53;
    recursion no;
    /* We no longer enable this by default as the dns posion exploit
        has forced many providers to open up their firewalls a bit */
    // Put files that named is allowed to write in the data/ directory:
    directory                "/var/named"; // the default
    pid-file                 "/var/run/named/named.pid";
    dump-file                "data/cache_dump.db";
    statistics-file          "data/named_stats.txt";
   /* memstatistics-file     "data/named_mem_stats.txt"; */
    allow-transfer    { "none"; };
};In order to secure your BIND nameserver, we will create an ACL / whitelist in your BIND configuration. The default configuration does not allow transferring of zone information. In order to give ns1.snel.com permission to transfer the zone information, we have to add the IPv4 and IPv6 of ns1.snel.com into our allow-transfer list.
Change the following configuration allow-transfer in the options section:
allow-transfer { "none"; };With the configuration below:
allow-transfer {
    89.207.128.251;
    2a00:7b80:476:ffff::1;
};This option makes it possible to notify the nameservers in the list if there is a DNS change.
Add also-notify in the options section of /etc/named.confof your BIND nameserver. :
also-notify { 89.207.128.251; };If you followed the instructions the options section of your options sections should be similar to the configuration below:
options {
    /* make named use port 53 for the source of all queries, to allow
         */
    // query-source    port 53;
    recursion no;
    /* We no longer enable this by default as the dns posion exploit
        has forced many providers to open up their firewalls a bit */
    // Put files that named is allowed to write in the data/ directory:
    directory                "/var/named"; // the default
    pid-file                 "/var/run/named/named.pid";
    dump-file                "data/cache_dump.db";
    statistics-file          "data/named_stats.txt";
   /* memstatistics-file     "data/named_mem_stats.txt"; */
    allow-transfer {
        89.207.128.251;
        2a00:7b80:476:ffff::1;
    };
    also-notify {
        89.207.128.251;
    };
};
Save the changes and verify that there are no syntax errors in the configuration file with the following command
named-checkconf /etc/named.conf
No output means no error, otherwise, you should resolve the errors.
Step 6 – Restart the nameserver
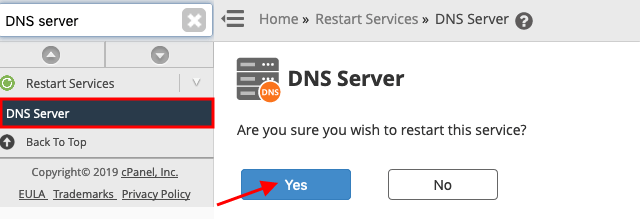
Go back to your cPanel/WHM control panel. Find DNS Serverunder Restart Servicesand click Yes to restart the DNS Server.

Step 7 – Pre delegated domain check
In this step, we will Add a DNS Zonein cPanel and check the DNS configuration online. In our article we used sneltest.nl. You can add a DNS zone under DNS Functions and click Add a DNS Zone. Add the IPv4 address of your server and the domain you want to add and Add Zone.

Once the domain is added visit the website to check your DNS configuration. Add your domain in the zone.tld input field and the nameserver in our situation this is ns1.snel.com, ns2.snel.com, and ns3.snel.com. Once the information is filled click Test Now. The website will now generate a report of your DNS configuration. Your DNS configuration can be score with three colors: Green, Orange, Red.
Green means that the DNS configuration is OK. If it’s orange or red it needs your ATTENTION!

Conclusion
Congratulations, you have configured our Secondary DNS Services on your cPanel. You’re now able to apply the DNS changes (ADD/EDIT/DELETE) directly within your cPanel without going to the control panel of the domain registrar.


Leave a Reply