Introduction
At Snel.com you can easily add or Expand SSD Disks on VPS storage to your VPS via your client area. This is quite handy when you run out of free space on your existing disk.
In this tutorial, we will go through the purchase of additional SSD disk space and attach it to your VPS. We can either use the additional space as a new disk and mount it on a separate directory or we can expand the existing disk. In this tutorial, we will look at both options.
Prerequisites
- You should be logged into your Snel.com client area
- Active VPS server
Step 1: Purchase Additional Storage
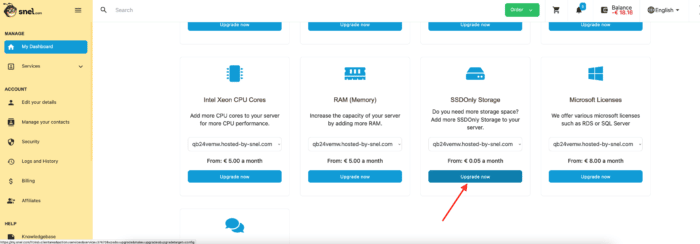
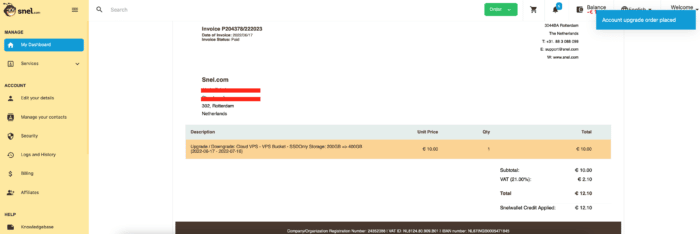
To purchase additional storage, click on Upgrade icon in your VPS dashboard and scroll to the bottom of page to the section Upgrade > SSD/MVMeOnly Storage > Upgrade now.
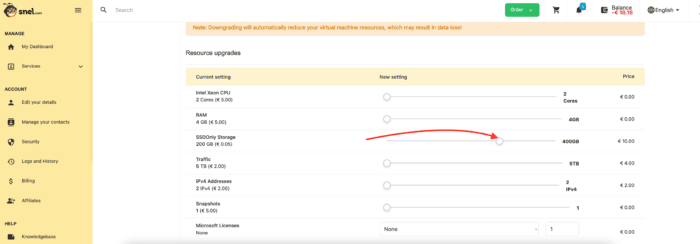
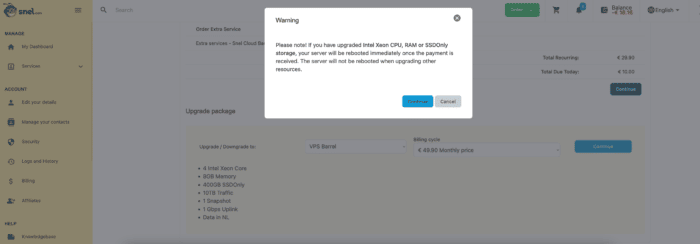
Now, change the slider on SSD only Storage to the required storage and click Continue button.
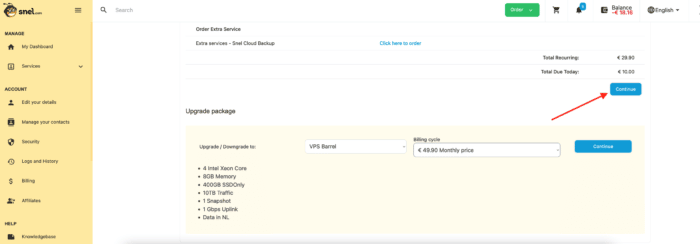
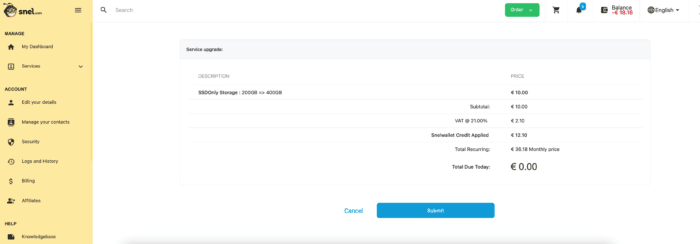
Complete the transaction by paying the generated invoice.
Now, you can either choose to create a new disk in your system and mount it on a separate directory. You will not lose any data stored on the original disk.
Step 2: Expand or add extra disk
Depending on your setup and storage strategy you can choose either to add the new disk as additional storage or expand the existing disk and partition. If you want to expand the existing disk follow the next step:
Step 2a: Expand the existing disk
Login to your dashboard and navigate to the Storage tab of your VPS. You will see your existing disk there. Click on the Expand link next to it.

Now, scroll the disk to all the maximum or desired size and save the changes.

Wait for few minutes for the system to provision disk and VPS to reboot.
Step 2.a.1 Verify Disk
Now that we have expanded the disk from Snel client area side. Now we will need to expand the partition. You can verify that the additional disk space has been added to your VPS by running the following command.
sudo lsblk
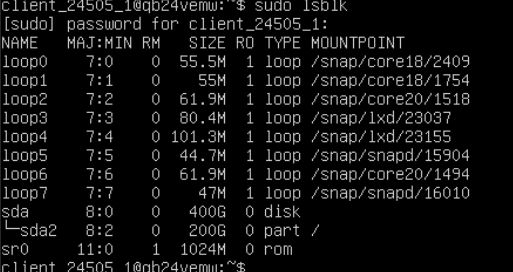
Notice the disk size of /dev/sda, it is 400 GB, but the partition /dev/sda1 is 200 GB.
Step 2.a.2 Find Filesystem of Existing Partition
Find the file system of the existing partition by running the following command.
sudo df -h -T
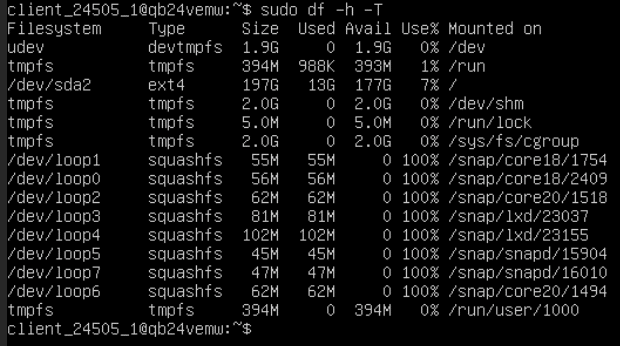
n the output above, we can see that the current file system is xfs, although in some cases, it could also be ext4. Additionally, take note of the partition name and mount point; in this example, the partition is /dev/sda2 and mount point is /.
Step 2.a.3 Resize partition and expanded filesystem
First, we need to install the necessary tools:
if hash apt-get 2>/dev/null; then
  apt-get update >/dev/null 2>&1 && apt-get -y install parted gdisk >/dev/null 2>&1 && apt-get -y install sfdisk
elif hash yum 2>/dev/null; then
  yum -y install parted gdisk sfdisk >/dev/null 2>&1
fi
You can extend the partition with the following commands:
ROOTDEVICE=$(awk '$2 == "/" {print $1}' /etc/mtab | grep -v rootfs | sed -e 's/^\(.*\)[0-9]\+$/\1/g')
ROOTPARTITION=$(awk '$2 == "/" {print $1}' /etc/mtab  | grep -v rootfs)
ROOTFS=$(awk '$2 == "/" {print $3}' /etc/mtab  | grep -v rootfs)
sgdisk -e $ROOTDEVICE >/dev/null 2>&1
sfdisk -d $ROOTDEVICE > /tmp/partitions.txt
sed -i "s|^\($ROOTPARTITION.*,\)\s\+size=\s*[0-9]\+,\(.*\)|\1\2|g" /tmp/partitions.txt
sfdisk --no-reread $ROOTDEVICE < /tmp/partitions.txt
partprobe
if [ "$ROOTFS" == "ext4" ]; then
  resize2fs $ROOTPARTITION
elif [ "$ROOTFS" == "xfs" ]; then
  xfs_growfs -d $ROOTPARTITION
fi
You can now verify that disk has been expanded by running the command df -h. This is the final step if you wish to expand the existing disk.
Step 2.b Add a new disk as additional storage
In this method, we will create a new disk from the additional storage we have purchased. We will create a new partition after attaching the new disk to the VPS. Finally, we will mount the partition on the VPS filesystem.
Step 2.b.1. : Create new disk and attach it to the VPS
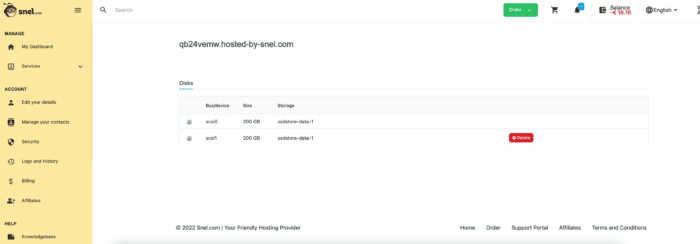
Navigate to storage tab in VPS dashboard and click on Add new disk option.
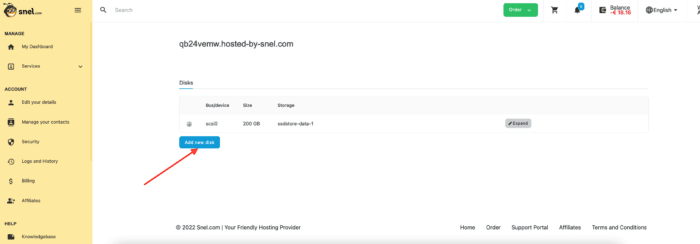
Change the slider according to your wish and click on button Add new disk. Your VPS will reboot as soon as you make this change. In a few moments, a new disk will be created and attached to your VPS.
Step 2.b.2: Find Newly Attached Disk
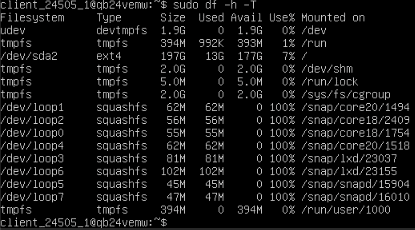
Get current filesystem information using the df -h command.
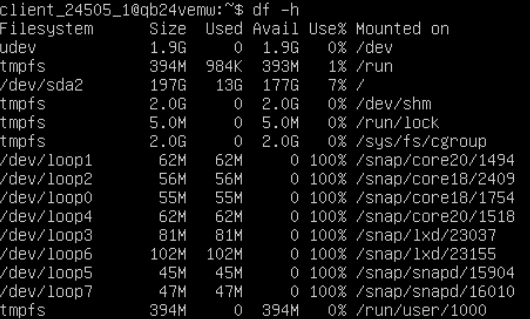
Notice that in the above output, we only have a single filesystem of 200GB mounted on /. Run the following command to get the information about the attached disks.
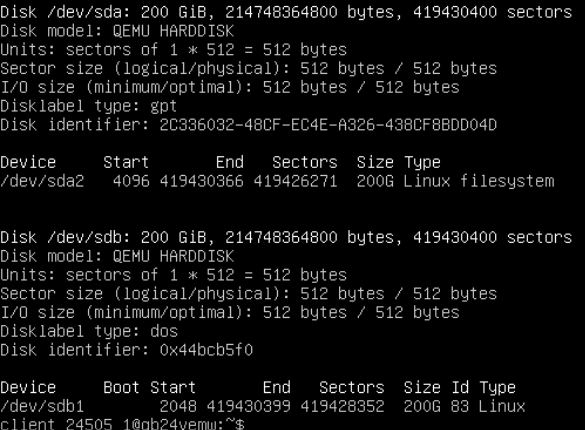
sudo fdisk -l
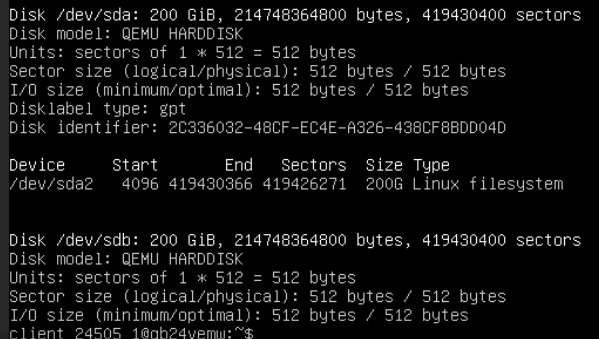
As you can see in the above example output in label 1, you can see the existing disk which has a partition /dev/sda. However, in label 2, you can see it does not have a partition.
To use the disk, we will need to create a partition. Please note the disk name /dev/sdb as we will need it for the next steps. The disk name may be different in your case, please note the actual value you get from the output of the above command.
Step 2.b.3: Create New Partition
To create a new partition, run the following command.
sudo fdisk /dev/sdb
Here, /dev/sdb is the disk name which you have obtained from the last step. Running the above command will run a wizard to create a new partition.
- Put command n to create a new partition.
- Next, It will ask for the partition type. Input p for selecting primary.
- Now, It will ask you for a partition number. You can enter 1, or you can simply press Enter key to choose the default option.
- Next, It will ask you for partition start sector number, press Enter key to choose the default value. Similarly, for the last sector also, choose the default value.
- Finally, press w to write the partition table.
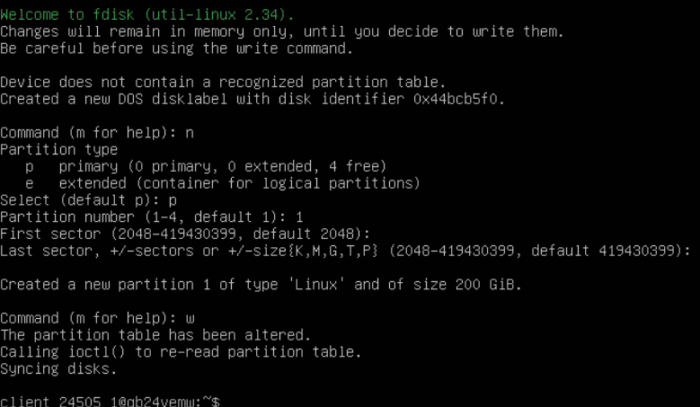
You can now run sudo fdisk -l command to see that a new partition named /dev/sdb1 has been added to the disk /dev/sdb. Make a note of the partition name /dev/sdb1 as we will need it for the next step.
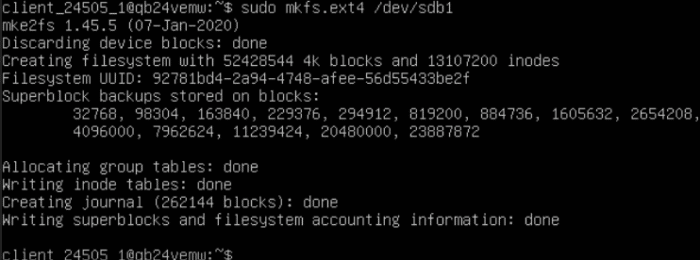
Step 2.b.4: Format New Partition and Create a Filesystem
Now that we have created a new partition, let’s format the partition and create a new file system. In Linux, we have the option to use many types of the available file system. To keep things simple, we will create a file which same as the filesystem on the other disk /dev/sda1.
Find out the filesystem of the existing partition of the disk which was attached to the VPS from the start using the command sudo df -h -T.
In the above output, we can see that my existing file system is xfs. So, I will also format the new partition using the xfs filesystem. Run the command for the same.
sudo mkfs.xfs /dev/sdb1
The above command will format the partition and will create a new partition with xfs filesystem.
If you see your existing filesystem type as ext4, please use the command sudo mkfs.ext4 /dev/sdb1 to create a new filesystem as ext4 type.
Step 2.b.5: Mount New Filesystem
Create a new directory to act as a mount point.
sudo mkdir /data
Here, you can choose any directory as the mount point instead of /data.
Mount the filesystem we created in the previous step to the directory we just created by running the command.
sudo mount /dev/sdb1 /data
To automatically remount the new filesystem on system restarts, open /etc/fstab in your favorite editor.
sudo vi /etc/fstab
Now add the following line at the end of the file.
/dev/sdb1 /data xfs defaults 0 0
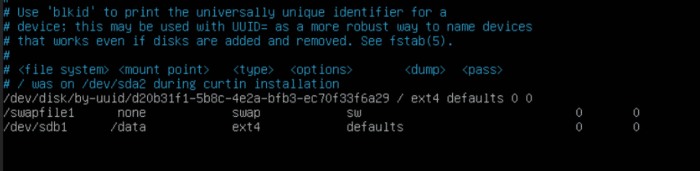
If your filesystem type is ext4, make sure to replace xfs in the above line.
Your new disk is now ready to be used.
Conclusion
In this tutorial, we have learned how to purchase additional disk on your Snel VPS and use it as additional storage or expend the existing disk.

Leave a Reply