In this article we will explain how to Add Email Accounts to Outlook from Microsoft 365
Staying organized when you have multiple email accounts can be challenging, especially if you find yourself juggling different mail applications. If you’re already using Outlook for Microsoft 365, for your Outlook.com email address for example, the good news is that Outlook allows you to add your Snel.com email and other email accounts as additional mailboxes so that you can use your different email accounts in one place. This guide describes the steps to add other email accounts to Microsoft Outlook.
Before You Get Started
- Outlook, like other mail clients, can automatically configure new email accounts which makes setup very fast and painless. However, automatic configuration does not always work. So, this guide steps you through a more thorough, manual setup process to avoid some of the problems associated with automatic configuration.
- This guide is specifically written for Outlook users using Microsoft 365. The general steps described below will work for older versions of Outlook. However, each screen-grab included in the guide is specifically from Outlook for Microsoft 365.
- The steps in this guide should work with most personal email accounts. Configuring Outlook to work with email accounts setup by an organization, such as your employer, may require additional steps beyond the scope of this guide.
- Most email providers support POP3 and IMAP protocols to synchronize email accounts with mail clients like Outlook. POP3 is a one-way synchronization protocol whereas IMAP is a more modern, *two-way* synchronization protocol. This guide uses the IMAP protocol which allows a given email account to be accessed from a variety of devices and computers while ensuring that account data is synchronized across those devices and computers.
Step 1 – Collect Email Provider Configuration Information
A little bit of preparation will go a long way to help you complete this guide successfully. Email providers, such as Yahoo and Gmail provide configuration instructions that include the details needed to configure mail clients like Outlook. You need to collect the relevant configuration information for each email account that you want to add to Outlook, which includes:
- username: This is the email address associated with the email account that you will be adding, e.g. `[email protected]`.
- password: This is the password that you use for your email account.
- protocol: You will use `IMAP` in this guide.
- IMAP incoming mail server name: This is the name of your email provider’s IMAP incoming mail server, e.g. `imap.your.provider`.
- outgoing mail server: This is the name of your email provider’s SMTP outgoing mail server, e.g. `smtp.your.provider`.
- IMAP incoming mail server port: This is the port used by the IMAP incoming mail server, e.g. `993`.
- outgoing mail server port: This is the port used by the SMTP outgoing mail server, e.g. `587`.
- IMAP incoming mail server encryption: This is the type of connection encryption used by the IMAP incoming mail server, e.g. `SSL/TLS`.
- IMAP outgoing mail server encryption: This is the type of encryption used by the SMTP outgoing mail server for connections, e.g. `SSL/TLS`.
As already mentioned, your email provider will be able to provide you with the configuration information above.
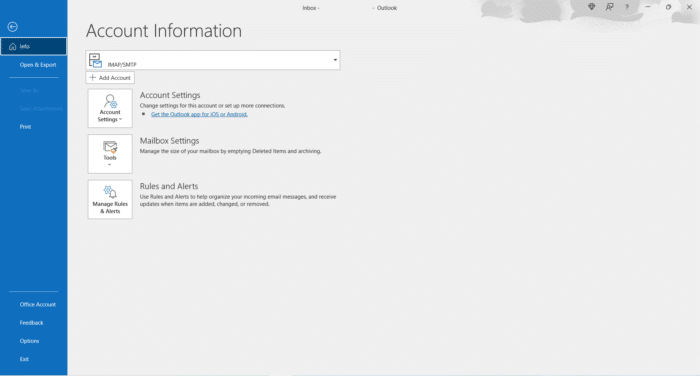
Step 2 – Start Mail Setup
Now that you’ve collected the required prerequisite information in Step 1, you’re ready to start configuring Outlook.
- In Outlook, click on File from the main menu to open the Account Information screen.
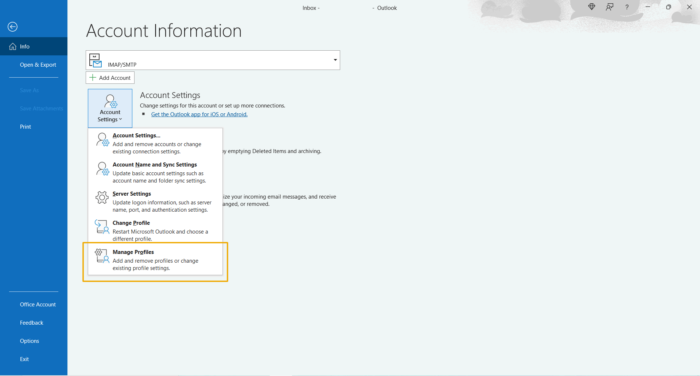
- Click on manage profiles.
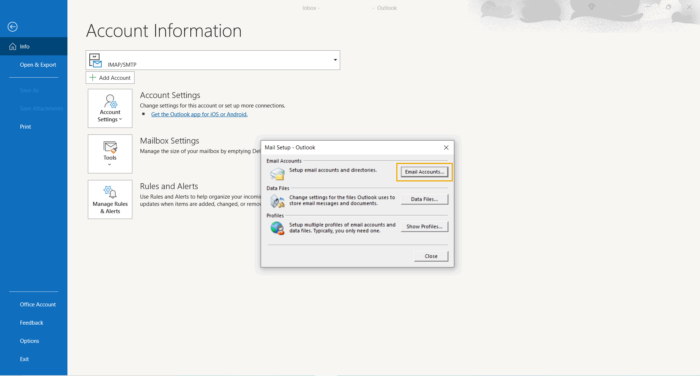
- Select Email Accounts from the Mail setup dialog window.
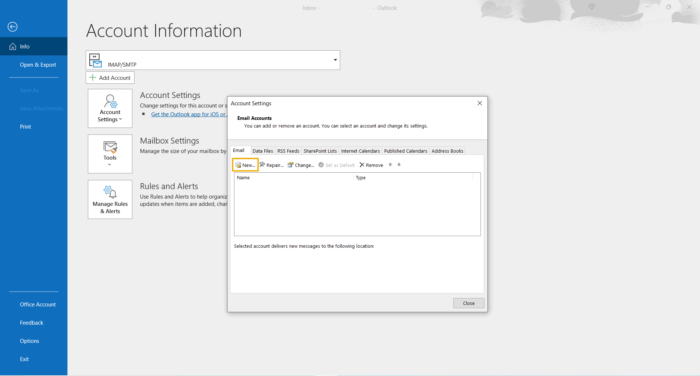
Step 3 – Create a New Email Profile
In this step, you will create a new email profile to add a new email account to Outlook. Email profiles contain the information that Outlook needs so that you can use a particular email account.
- Following Step 2, an Email Accounts window will be open and you will see the Email tab already selected.
- Click on New.
- A second Add Account window will open with fields for your name, email address, and password. However do not enter any information yet as this limited set of fields is used for automatic configuration which – as mentioned earlier – does not always work.
- Instead, select the `Manual setup or additional server types` option which will grey-out the name, email address, and password fields.
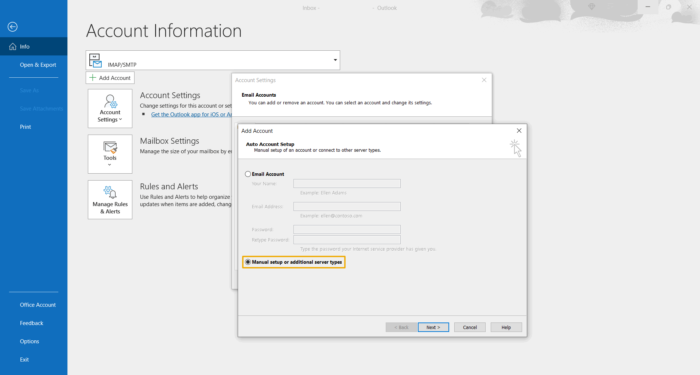
- Click Next.
- Select POP or IMAP from the Choose Your Account Type options screen.
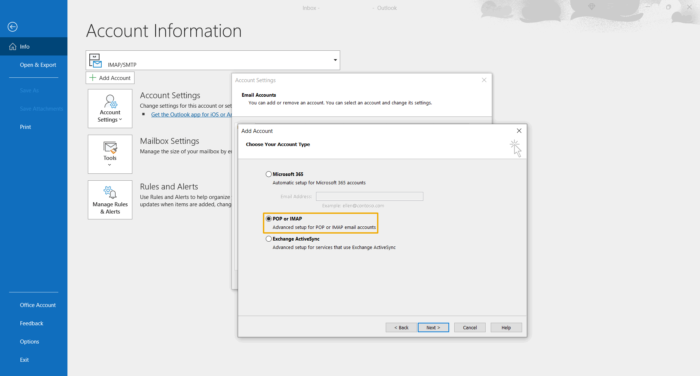
- Click Next.
Step 4 – Set Basic Configuration for the New Email Profile
Now you are ready to start adding the information you collected in Step 1 to the your new Outlook email profile.
- Following Step 3, you will be presented with the screen.
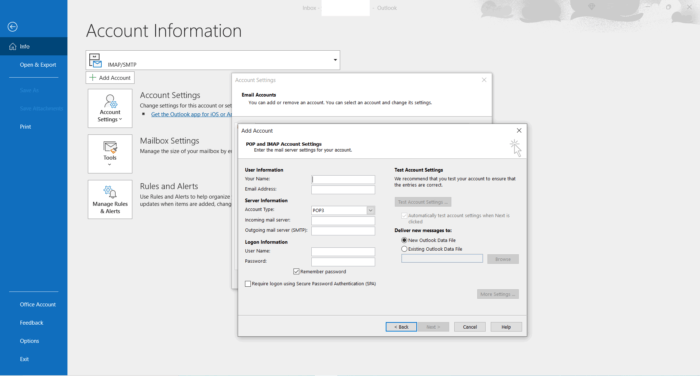
- Under the User information section:
- Enter your name into the Your Name field.
- Enter your email address into the Email Address field.
- Under the Server information section:
- Select `IMAP` from the Account Type dropdown menu.
- Enter the name of your email provider’s IMAP incoming mail server in the Incoming mail server field.
- Enter the name of your email provider’s outgoing mail server in the Outgoing mail server (SMTP) field.
- Under the Login information section:
- Enter your email address in the User Name field.
- Enter your email account password in the Password field.
- Ensure the Remember password checkbox is selected.
- Click More Settings.
Step 5 – Set Advanced Configuration for the New Email Profile
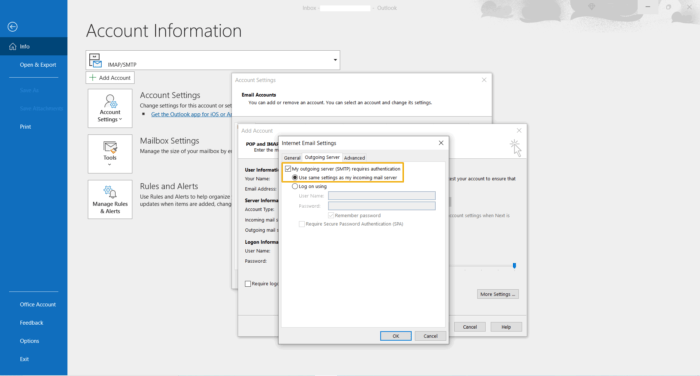
- Following Step 4, a third Internet Email Settings window will open.
- The General tab will already by selected and populated with your email address. You do not need to add any additional information on this tab.
- Select the Outgoing Server tab.
- Select the `My outgoing mail server (SMTP) requires authentication` option which will “un-grey” the .
`Use the same settings as my incoming mail server` option. Leave the `Use the same settings as my incoming mail server` option selected.
- Select the Advanced tab.
- The Server Port Numbers configuration section will be at the top of the Advanced tab screen, with pre-populated port number values for the Incoming server (IMAP) and Outgoing server (SMTP) fields. There is a good chance these default values will not be the correct values for your email provider. You can change them as necessary.
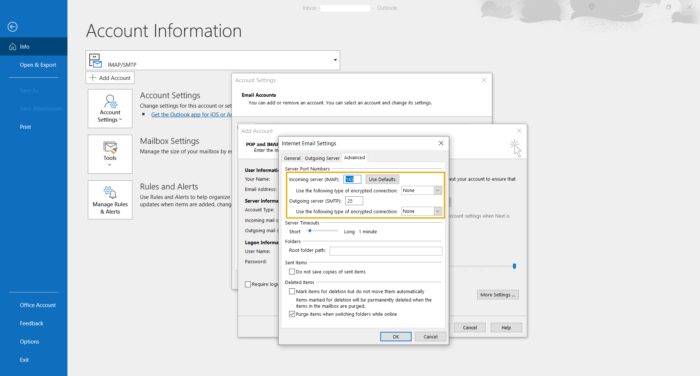
- Under the Server Port Numbers section:
- Enter the IMAP incoming mail server port number in the incoming server (IMAP) field.
- Select the encryption option, e.g. `SSL/TLS`, from the Use the following type of encrypted connection dropdown menu under the Incoming server (IMAP) sub-section.
- Enter the outgoing mail server port number in the Outgoing server (SMTP) field.
- Select the encryption option, e.g. `SSL/TLS`, from the Use the following type of encrypted connection dropdown menu under the Outgoing server (SMTP) sub-section.
- The advanced configuration is now complete. Click Ok to close the Internet Email Settings window.
Step 6 – Finalize New Email Profile and Test
- Following Step 5, you will be returned to the POP or IMAP Account Settings screen.
- Your new email profile configuration is now complete.
- Click Next.
- A new Test Account Settingswindow will open displaying Outlook’s progress performing a send email test and a receive email test to make sure your new email profile is working correctly.
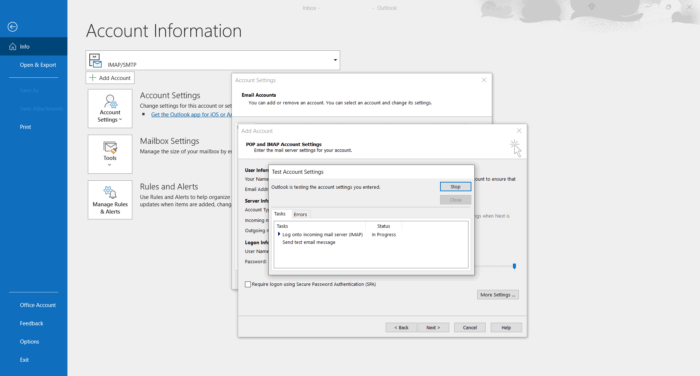
- If both tests are successful, you will see two green marks by each test and you can now use your email account in Microsoft Outlook to send and receive mail. Click Close to begin using your new email profile.
- If one or both tests fail, you will see a red mark by the particular test. The email profile configuration may be incorrect. Go back to Step 1 and double-check that you have the right configuration information for your email provider. If one or more configuration settings was incorrect, complete Steps 2 to 6 again using the correct configuration settings for your email provider.
Also good to know about Email accounts in Microsoft Outlook.
Outlook from Microsoft 365 allows you to consolidate the use of multiple email accounts in a single application. Other configuration steps, such as firewall configuration, may be required depending on how your environment is setup. However, the steps described here should work to setup most personal email accounts with Outlook.

Leave a Reply